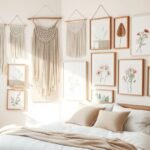
When boredom hits, why not try some fun DIY projects? You can make melted crayon art by heating crayons on canvas, or whip up a slime stress ball thats both fun and squishy. Got some old glass bottles lying around? Wrap them in colorful tissue paper for unique centerpieces. If youre into crafts, consider building a cardboard dollhouse or sewing a custom tote bag. Stick around, and you’ll find even more creative ideas to spark your boredom-busting session!
Key Takeaways
- Create vibrant art by melting crayons on canvas using a blow dryer for a unique aesthetic touch.
- Make colorful, scented slime and transform it into stress balls by encasing it in balloons for a fun sensory experience.
- Repurpose glass bottles into eye-catching centerpieces with colorful tissue paper and decoupage techniques for home decoration.
- Design a DIY bulletin board with fabric and ribbons to showcase your favorite memories in a stylish way.
- Personalize everyday items like mugs and lampshades using oil-based paint or stencils for a custom aesthetic look.
Melted Crayon Art
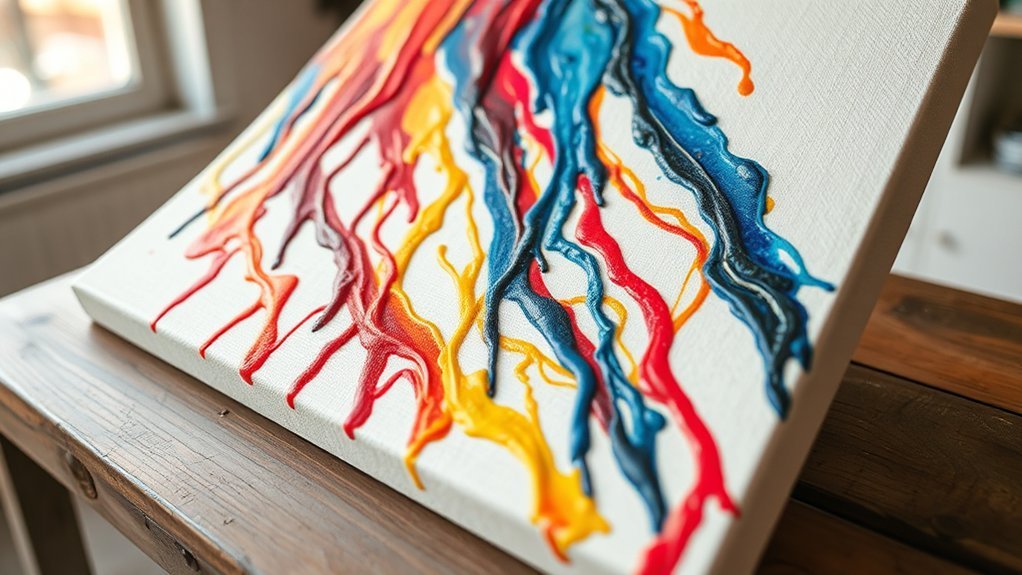
Melted crayon art is a fun and creative way to brighten up your space.
Discover the joy of melted crayon art to add vibrant colors to your home decor.
You can easily transform a canvas into a vibrant masterpiece using crayon techniques.
Start by gathering a pack of colored crayons and a canvas.
Use a blow dryer or hot glue gun to melt the crayons, creating colorful drips or unique shapes.
Remember to take safety measures, like wearing gloves and working in a well-ventilated area, so you dont accidentally burn yourself or inhale fumes.
As you experiment, think about patterns you want to create, like geometric designs or flowing streams.
Check out a simple guide for step-by-step instructions to help you along the way.
Have you ever tried this before? Its a great way to express your creativity!
Slime Stress Ball
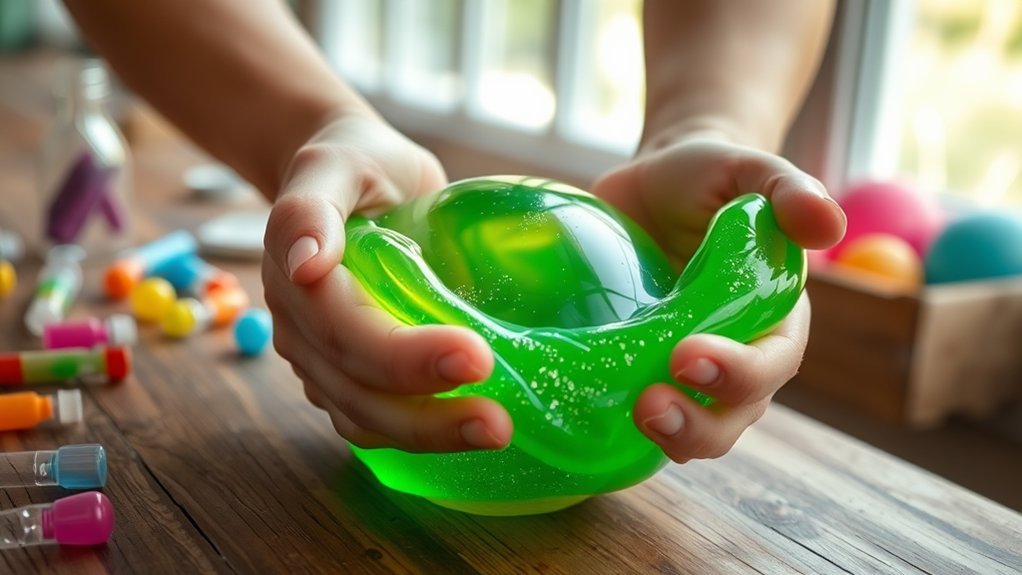
Have you ever found yourself feeling stressed and in need of a quick way to unwind?
Making a slime stress ball is perfect for that!
Start by mixing glue, water, and borax to create a gooey slime base.
Knead it until its smooth and elastic.
Next, use a funnel to pour the slime into a balloon.
This is where the balloon wrapping comes in.
Once filled, you can wrap the balloon in a fishnet stocking for a fun, bubbly texture.
You can even experiment with different slime variations by adding colors or scents!
Now youve got a portable stress ball to squeeze during boring moments.
Its a simple, fun project that helps you release frustrations.
Give it a try!
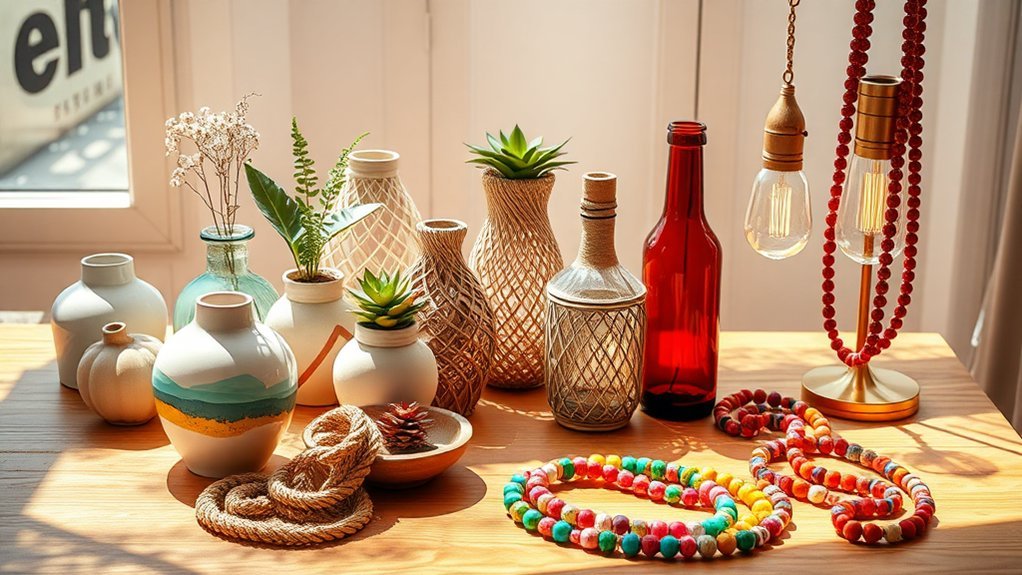
Glass Bottle Tissue Paper Centerpieces
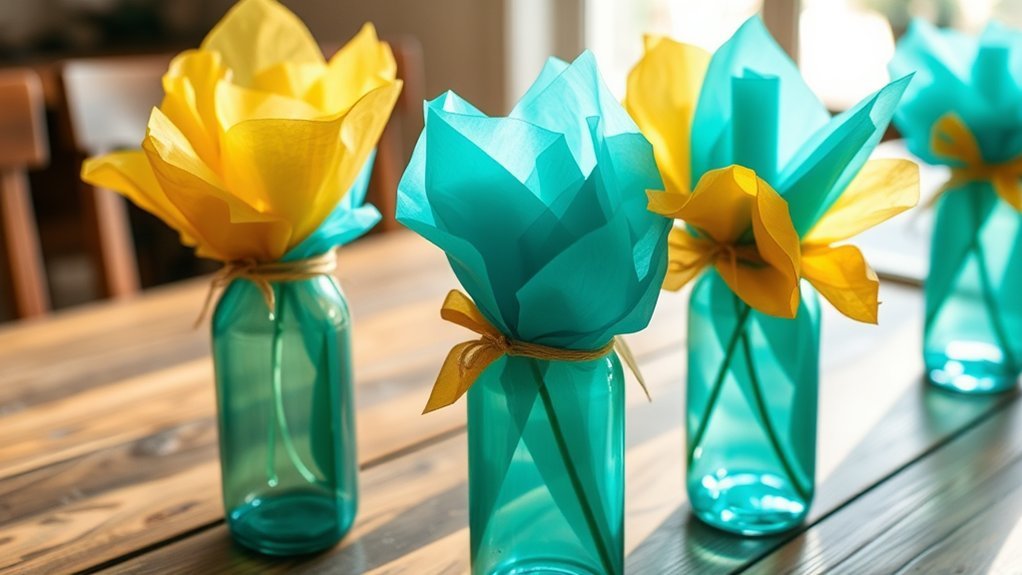
Looking for a fun and easy way to spruce up your space? Glass Bottle Tissue Paper Centerpieces are perfect for you!
Start by reusing old glass bottles, wrapping them with colorful tissue paper. Use Mod Podge to decoupage the paper onto the bottles, which helps it stick well and look smooth.
Transform old glass bottles into vibrant decor by wrapping them in colorful tissue paper and applying Mod Podge for a smooth finish.
You can even add printed paper shapes, like hearts or circles, to personalize your holiday bottles.
This project is great for any occasion, whether it’s a party or a family gathering. Plus, its simple enough for beginners to make professional-looking decor.
DIY Bulletin Board
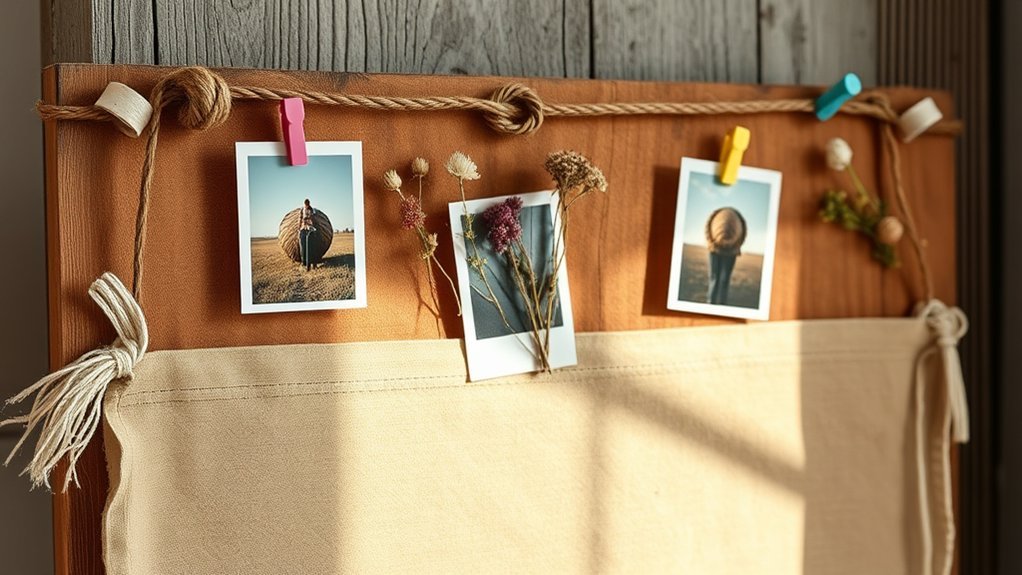
Ever wonder how to keep your notes, photos, and reminders organized in style? A DIY bulletin board might be just what you need. Using simple board materials like cardboard, you can create a functional piece that looks great. Heres how to get started:
- Cover your board with fabric that matches your style.
- Use criss-cross ribbons for easy display techniques; you can slide items in without pins.
- Secure everything with scissors, pins, or hot glue.
This bulletin board won’t only keep your space tidy, but itll also add a personal touch to your office. Follow an easy guide for step-by-step instructions, so anyone can make it. Get creative and enjoy your new organizational tool!
Cardboard Dollhouse
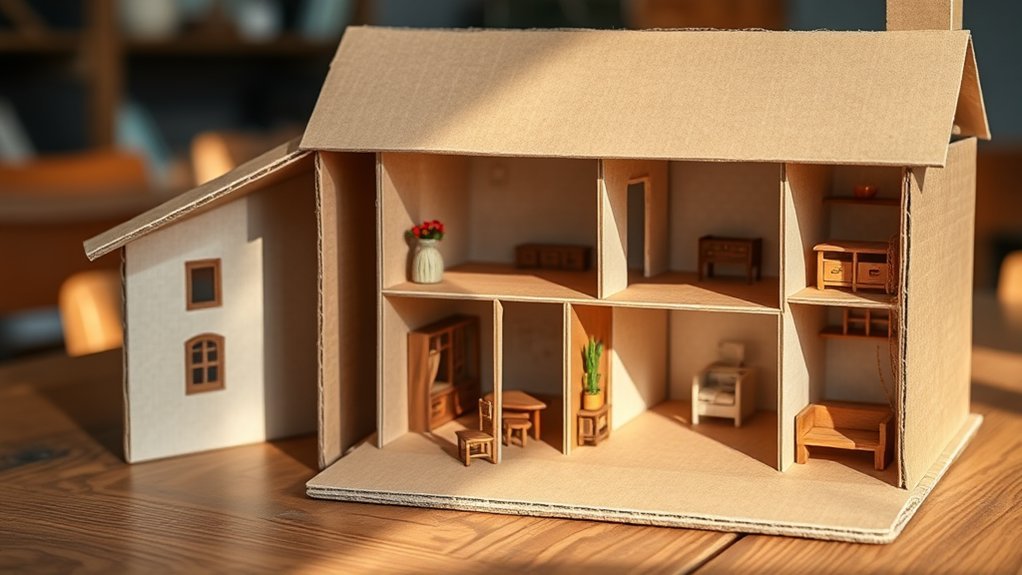
Creating a cardboard dollhouse is a fantastic way to express your creativity while recycling materials you already have at home.
Start by grabbing a shoebox or moving box for sturdy walls and roofs. Use scissors or a razor knife to cut the cardboard into fun shapes for your custom design.
Once youve built the structure, its time to decorate! Try using acrylic paint for vibrant colors, or add magazine cutouts for unique patterns.
Dont forget to make your own dollhouse furniture from leftover cardboard pieces.
This projects perfect for all ages, and you can find plenty of guides online for step-by-step help.
Pencil Bag
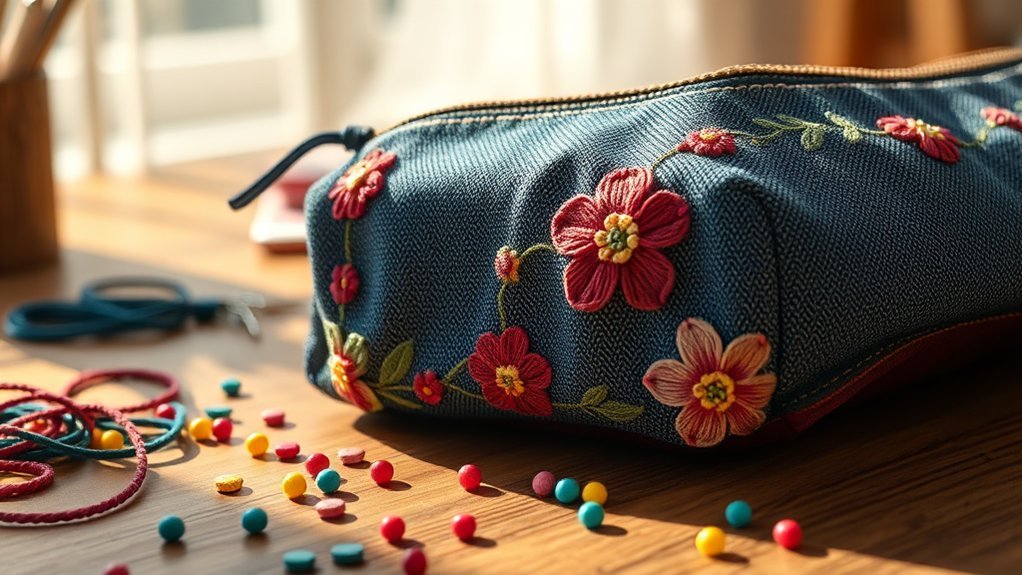
After finishing your cardboard dollhouse, why not whip up a matching pencil bag?
Its a fun way to create personalized pencil storage.
Start with some sturdy fabric, like cotton or canvas, and grab your scissors.
Cut two rectangles, about 8 inches by 10 inches.
Sew them together, leaving one side open, and youve got yourself a pouch!
To add some flair, consider these options for your bag embroidery:
- A colorful zipper for easy access
- Fun buttons or Velcro for closure
- Old fabric scraps to express your unique style
Youll have a functional pencil bag that looks great, too.
Plus, its a perfect accessory for school or work.
Ready to get started?
Decoupage Jars
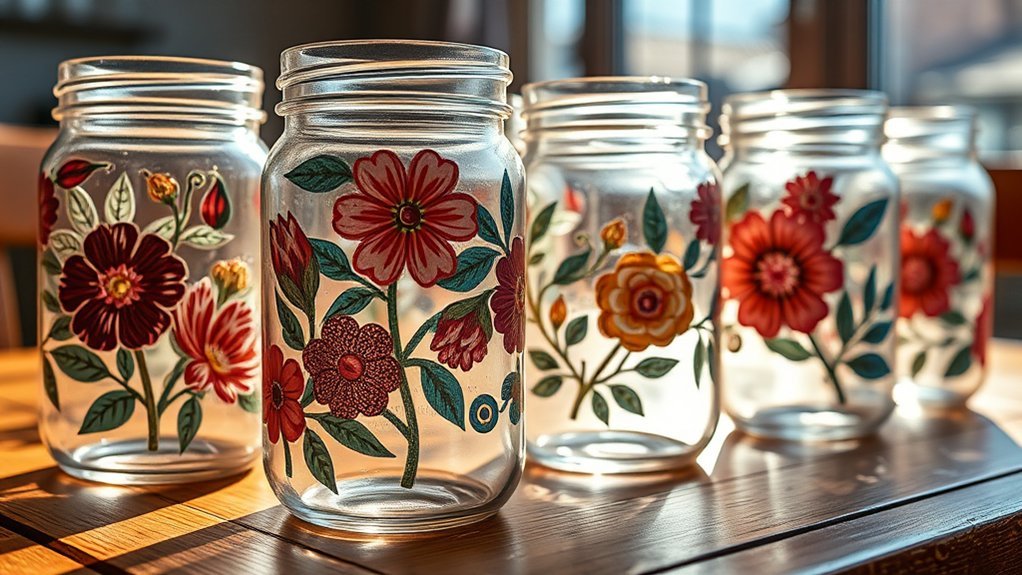
Decoupage jars are a fantastic way to upcycle those empty glass jars lying around your home.
Youll start by painting decoupage glue onto the jars surface. Next, grab some old paper or fabric scraps, and paste cut-out images or patterns directly onto the glue. Its like giving your jars a fresh outfit!
For that polished look, make sure to apply 2-3 layers of decoupage glue over your designs.
This step is essential for proper jar sealing and guarantees your artwork lasts.
If you follow a guide, youll get smoother results and avoid any messy surprises.
Paper Rings
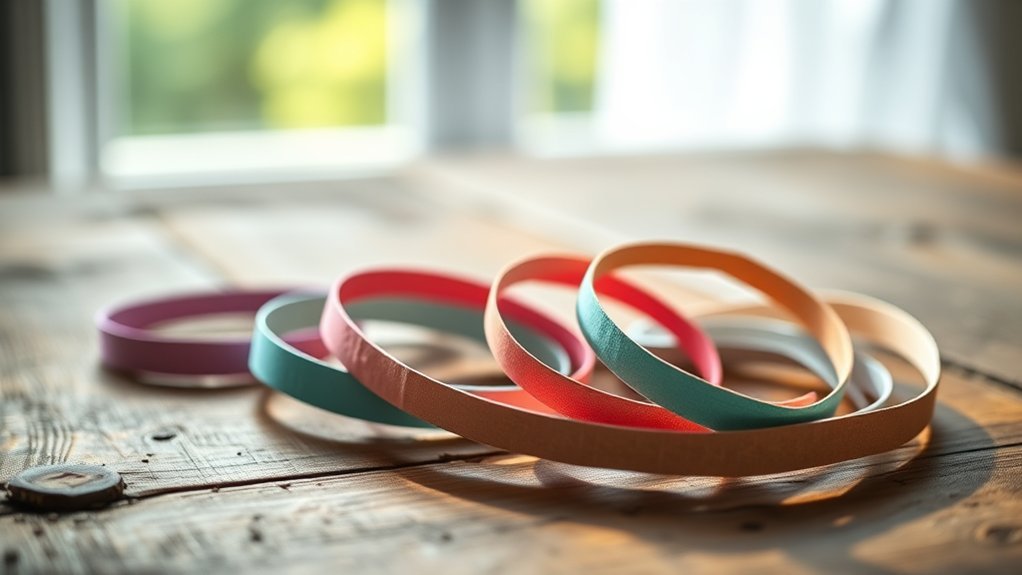
Making paper rings can be a fun and easy way to express your creativity.
You can create elegant jewelry pieces using different techniques and paper variations.
Try these ideas for your ring designs:
- Wrap colorful paper around a form for a simple yet chic look.
- Experiment with origami folds for a unique twist.
- Use dollar bills for a quirky, unexpected style.
Secure the ends with glue or tape to keep your rings sturdy.
Dont forget to jazz them up! Add butterfly shapes or use beads and embellishments for a personal touch.
If you’re new to this, a detailed instruction guide can help you master the folding process.
DIY Lampshade Decorations
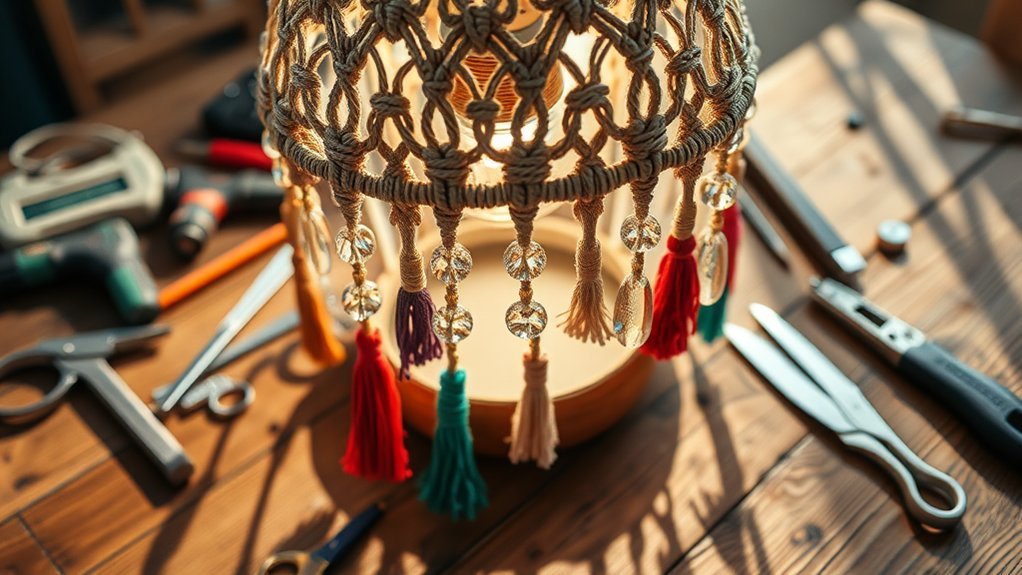
A DIY lampshade can really brighten up your space and showcase your style.
You can enhance a plain lampshade using fun materials like paint, trim, and various lampshade fabrics.
Why not get creative with shade stencils?
They can add intricate designs that make your lampshade a unique focal point.
Dont forget, you can decorate both the inside and outside for extra flair.
Layering different fabrics and paper not only adds texture but also makes it visually interesting.
Follow some expert tips, and youll achieve professional-looking results.
So, grab your supplies and get started!
Your lampshade could be the standout feature every room needs.
Are you ready to transform your lighting into a work of art?
DIY Mug Designs
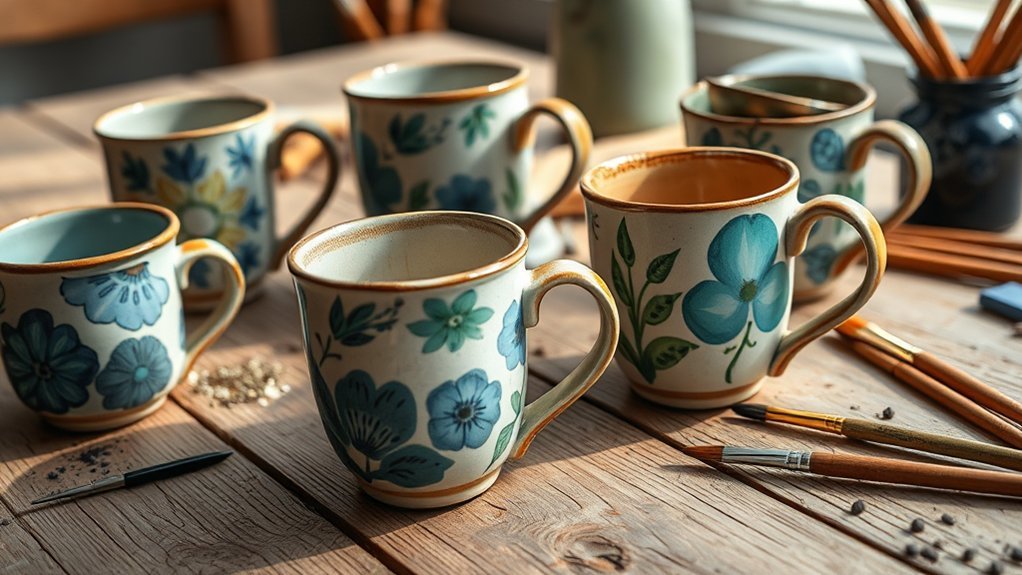
Once youve added some flair to your lampshade, why not turn your attention to your mugs?
Mug customization is a fun way to express your creativity.
Personalizing your mugs is a delightful way to unleash your artistic side and make unique creations.
You can easily personalize a plain mug using oil-based paint pens or acrylic paint.
Heres how you can get started:
- Use printed images and packing tape for simple transfer methods.
- Experiment with different designs to make unique gifts.
- Follow easy guides to guarantee success, even if youre a beginner.
In just one sitting, you can create beautiful mugs for yourself or friends.
Whether youre sipping coffee or giving a gift, these customized mugs will brighten your day.
Lucky Paper Stars
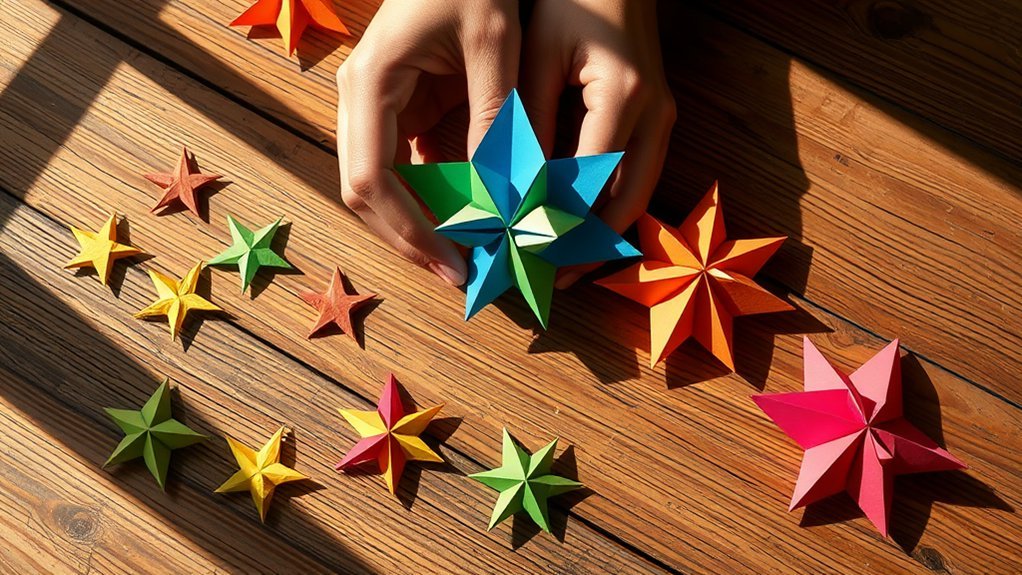
Lucky paper stars are a fun and easy way to add a bit of charm to your home. You can make them by folding paper strips into hexagons, then puffing up the corners to create delightful little stars. These stars have interesting Star Origins, rooted in various cultures as symbols of luck.
Heres a simple guide to get started:
| Step | Description |
|---|---|
| Cut Strips | Cut colorful paper into long strips. |
| Fold Stars | Follow an origami guide to fold your stars. |
| Display Ideas | Show off your stars in a jar or on a string. |
These charming stars can brighten up any space. So, why not give it a try and bring some luck into your home?
Rubber Band Guitar

Making your own rubber band guitar is a fun way to bring some music into your home.
You can easily create this simple instrument using a shoe box or a paper plate.
Heres how to get started:
- Stretch 4-6 rubber bands across the opening for strings.
- Experiment with string tuning by adjusting the tightness of the bands.
- Use pluck techniques to create different sounds when you strum them.
Feel free to decorate your guitar with paper, markers, or anything else to make it yours.
This project is perfect for both kids and adults, so grab some rubber bands and let your creativity flow.
You can even jam with friends and explore simple melodies together.
Jewelry Holder
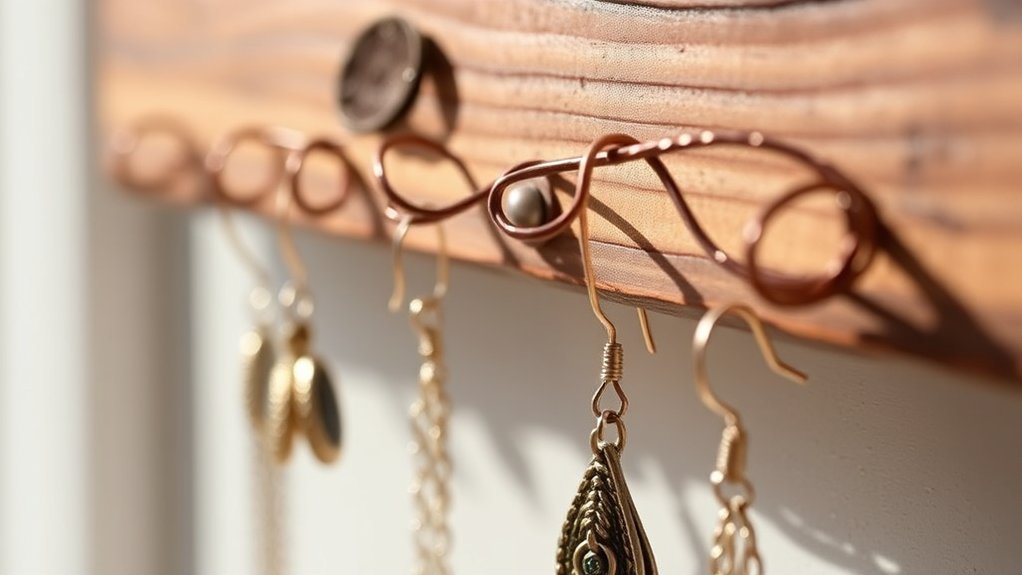
Have you ever wondered how to keep your jewelry organized without spending a fortune? You can create a stylish jewelry holder using items you already have at home.
Start by repurposing a cardboard box; cut it and decorate it with fabric scraps or acrylic paint. Its a fun way to follow current jewelry trends!
You can also use decoupage techniques on glass jars for a unique holder for rings and bracelets.
For earrings and necklaces, add criss-cross ribbons to a fabric-covered base.
If you have sturdy fabric, sew it into an organizer with a zipper closure.
Finally, wrap old glass bottles with tissue paper and Mod Podge for a festive touch.
These storage innovations will make your collection shine!
DIY Jack-in-the-Box
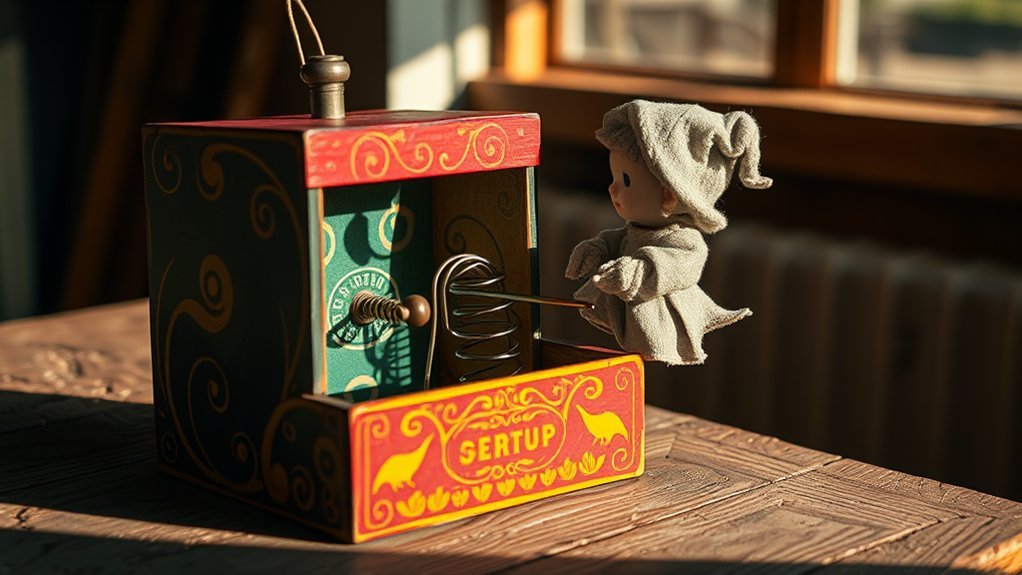
After organizing your jewelry, you might want to tackle another fun project: a DIY Jack-in-the-Box.
This simple craft can be done in under 30 minutes and is a great way to blend creativity with engineering.
This quick and engaging craft merges creativity and engineering in just 30 minutes of fun!
Heres what youll need:
- A cardboard box as your base
- A spring or rubber band for the Jack mechanism
- A small toy or figurine to pop out as the surprise
Start by decorating your box with paints or fabric scraps.
Secure the spring inside the lid and attach your figurine.
You’ll create a delightful box surprise that will surely bring smiles.
For extra flair, consider adding bells or LED lights.
Its a fun, interactive project thats perfect for ages 8 and up!
No-Sew Pillow Cover
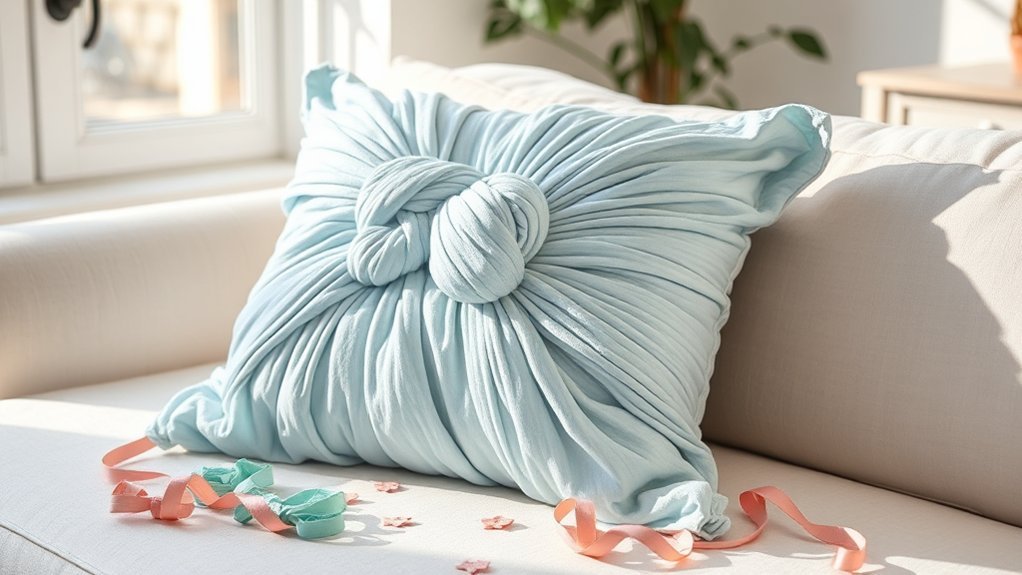
Ever wondered how to refresh your home decor without picking up a needle and thread? You can create a no-sew pillow cover in just a few steps! Start by cutting two identical fabric rectangles, using sturdy Fabric Options like cotton or fleece. Secure the edges with gluing techniques like fabric glue or iron-on hem tape.
Heres a quick guide:
| Step | Description |
|---|---|
| Cut Fabric | Two rectangles, slightly larger than pillow |
| Secure Edges | Use fabric glue or iron-on hem tape |
| Add Decor | Attach ribbons, buttons, or fabric paint |
| Assemble | Layer and bond, then enjoy your custom cover |
This projects beginner-friendly and can be done in under 30 minutes!
DIY Sensory Bottles
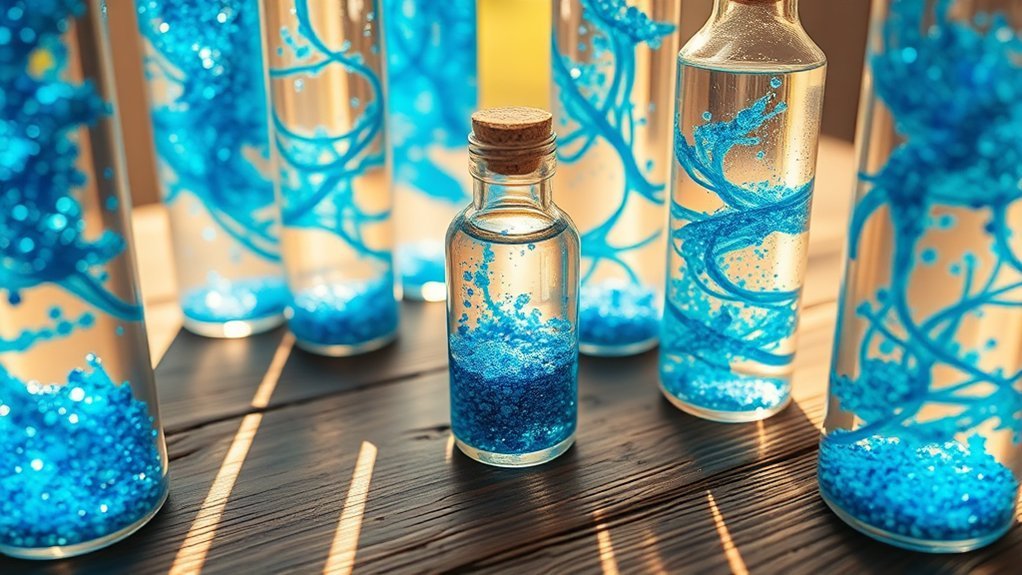
Looking for a fun and easy way to create something cool at home? DIY sensory bottles are perfect for some hands-on sensory play and can help with anxiety relief too!
Discover the joy of DIY sensory bottles for fun, hands-on play and soothing anxiety relief at home!
Grab a clean, empty bottle and fill it with layers of interesting stuff.
Here are some ideas to get you started:
- Water, oil, and food coloring for a colorful swirl
- Glitter and beads for sparkling visual effects
- Small toys or shells for themed creations
Seal it tight with a glue gun or tape, and youre all set!
These bottles aren’t just calming to watch but also promote sensory development.
Follow online tutorials for tips and measurements, and enjoy your relaxing, DIY masterpiece.
Felt Car Freshies
Have you ever thought about giving your car a fresh scent while adding a personal touch? Felt car freshies are a fun, easy DIY project you can try at home. Youll need colorful felt, scissors, and essential oils. Cut out fun shapes like hearts or trees, then add a few drops of your favorite scent blends, like lavender or citrus.
Sew or glue the edges to create a pocket for the oils. You can personalize these freshies with beads or markers, matching them to your cars theme. Use string to hang them from your rearview mirror; its a stylish way to diffuse those lovely scents while driving.
| Supplies Needed | Hanging Methods |
|---|---|
| Colorful felt | String from mirror |
| Essential oils | Clips or hooks |
| Scissors | Ribbon for style |
| Sewing tools | Adhesive for pockets |
Paper Clock
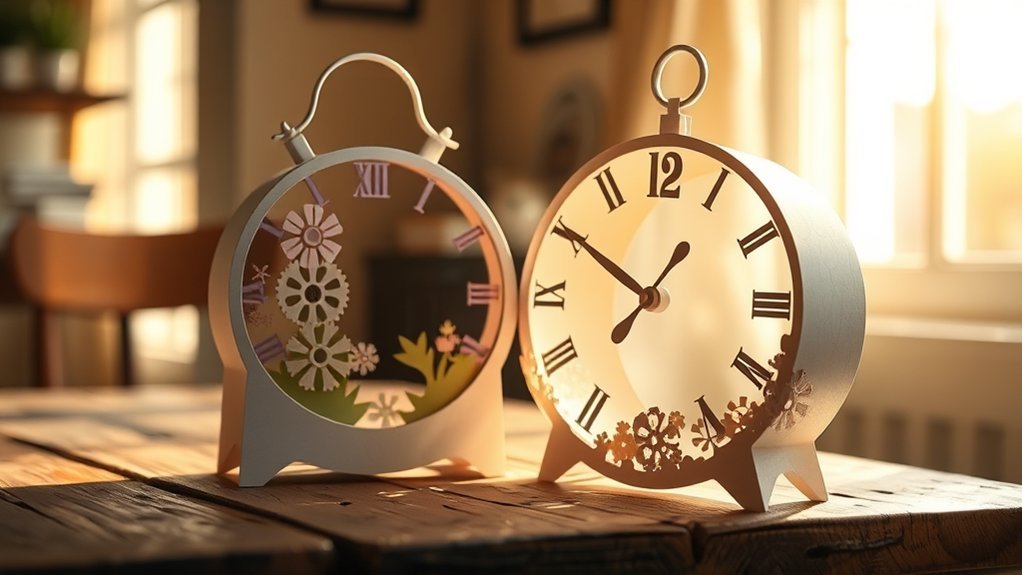
Creating a paper clock is a fun and straightforward project that anyone can tackle.
Youll only need a few basic materials, and its perfect for learning about time while adding some flair to your space.
This project requires just a few simple materials, making it a fun and stylish way to learn about time.
Heres what youll do:
- Use a paper plate as the base and draw numbers 1 to 12 around the edge.
- Make clock hands from cardboard strips and secure them with a brass fastener in the center.
- Customize your clock with colored markers, stickers, or patterned paper for extra style.
In less than 30 minutes, youll have a unique clock thats great for both Clock Customization and Time Education.
You can even make mini versions for dollhouses or large ones for your wall.
How cool is that?
Hanging Cloud Decoration
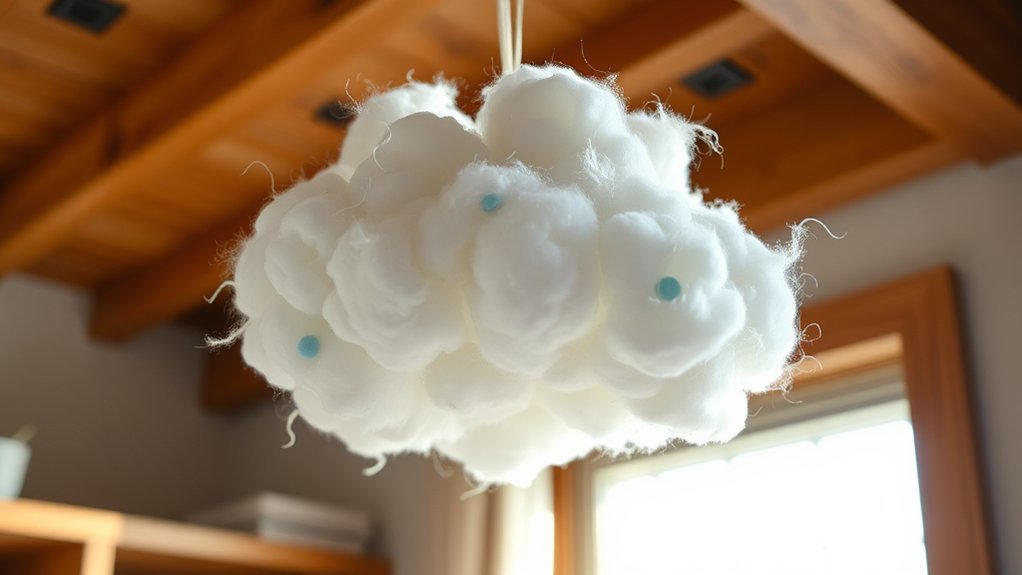
After you’ve crafted that cool paper clock, why not add a whimsical touch to your room with a hanging cloud decoration?
This project is super easy and affordable, costing under $10.
Start by making a frame assembly using wire or cardboard shaped like a cloud.
Then, stuff it with cotton balls or polyfill for a fluffy look.
Secure layers of white fabric or batting over the frame using hot glue.
To enhance your cloud lighting, add small LED lights inside for a soft glow.
Hang your cloud from a ceiling hook or mobile arm at different heights.
It’ll create a dynamic, floating display that brightens up any space. Ready to transform your room?
Bouncy Ball (Without Borax)
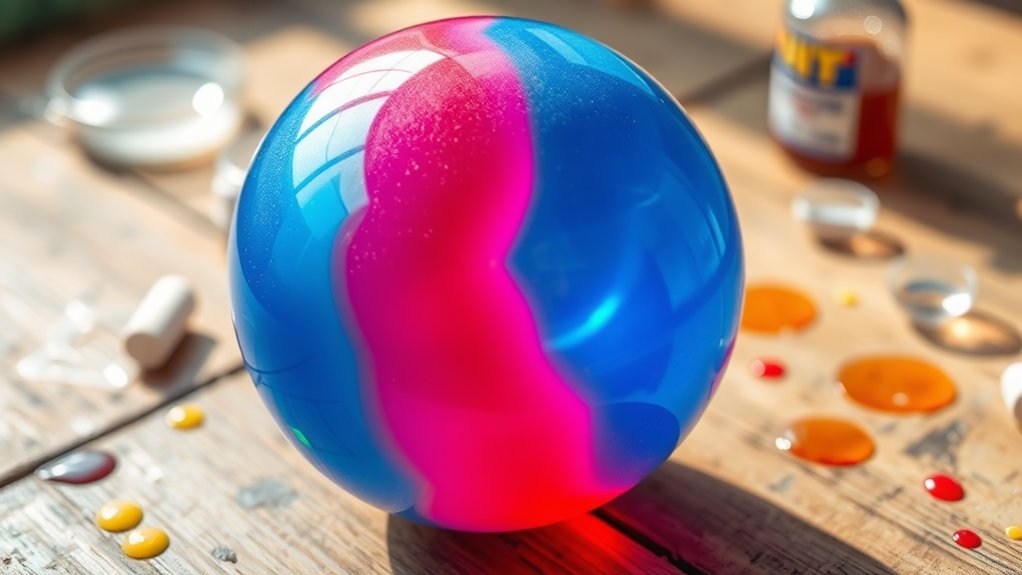
Wondering how to make a bouncy ball without using borax? Its easier than you think!
Start by mixing 1/2 cup of white glue with 1/2 cup of cornstarch and a few drops of food coloring.
Knead this mixture by hand for about 5-10 minutes until its a smooth, elastic dough.
Then, roll it into a tight ball and let it air-dry for 1-2 hours.
This helps enhance its ball texture and bounce science.
You can even add some flair with:
- Glitter for a sparkling finish
- Small beads for extra detail
- Your favorite colors for personalization
Finally, store your finished bouncy ball in an airtight container to keep it bouncy and fun!
DIY Can Pencil Holder
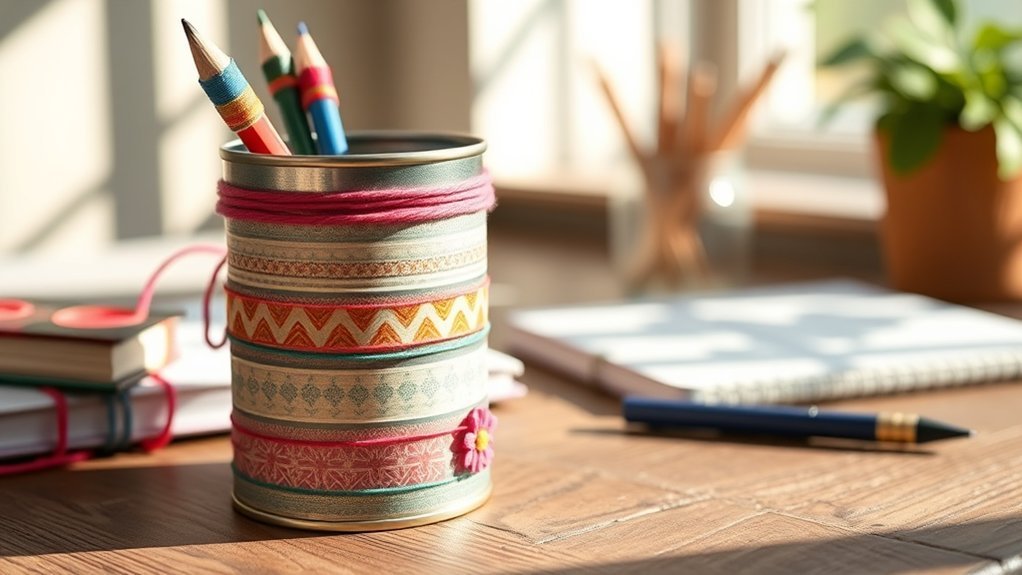
If youve just finished making that fun bouncy ball, why not keep the creative vibes going? You can easily transform an empty tin can into a stylish pencil holder. First, clean the can and remove any labels. Next, grab some colorful paper, fabric scraps, or paint. Use glue or Mod Podge to decorate it. You can also add embellishments like ribbons or stickers to make it unique.
Heres a quick overview of the steps:
| Step | Action |
|---|---|
| 1 | Clean and label-free can |
| 2 | Choose decoration materials |
| 3 | Adhere materials with glue |
| 4 | Add embellishments |
| 5 | Organize your pencils inside |
This eco-friendly project is perfect for can recycling and pencil upcycling!
Homemade Chalk
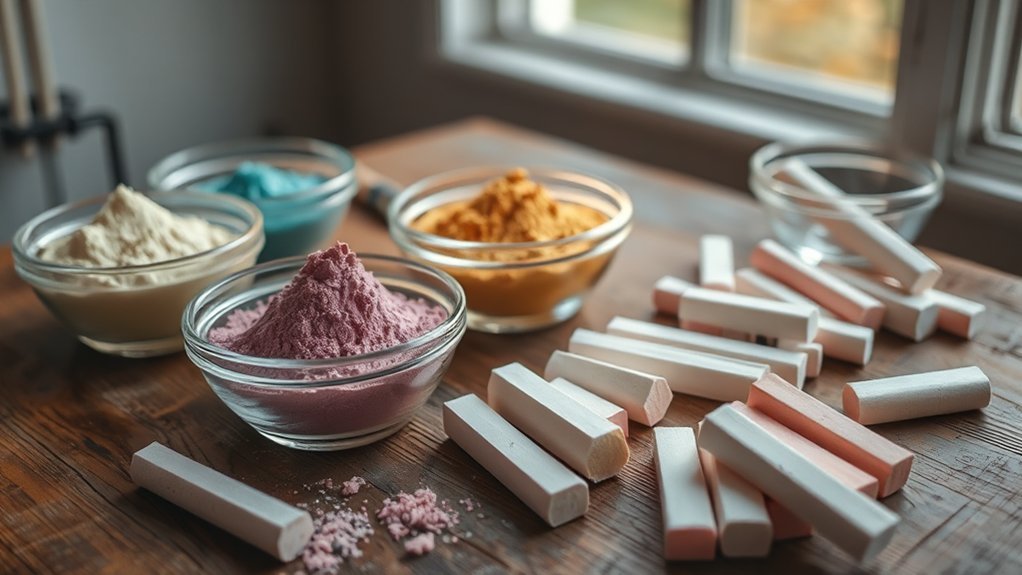
Have you ever thought about making your own chalk at home? Its a fun, eco-friendly project that taps into chalk history and lets your creativity shine. Youll only need a few simple ingredients to get started:
- 1 cup of plaster of Paris
- 1/2 cup of water
- A few drops of food coloring or powdered tempera paint
Just mix everything, pour it into molds like toilet paper rolls or silicone trays, and let it set for 24-48 hours.
Mix the ingredients, pour into molds, and let it set for 24-48 hours for colorful homemade chalk.
Once its dried, youll have smooth, colorful chalk to use on sidewalks or blackboards.
You can even add essential oils for a unique twist!
This safe activity is perfect for kids aged 5 and up, making it a great way to pass the time.
Bubble Snake Maker
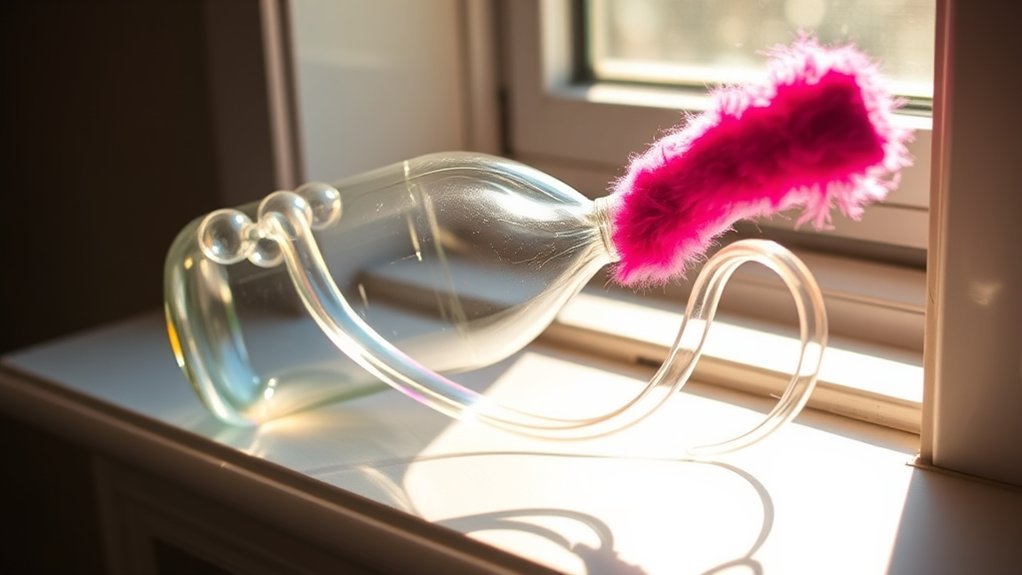
Looking for a fun and easy way to blow some bubbles? Try making a bubble snake maker!
Cut the bottom off a plastic bottle and secure a sock or washcloth to the cut end with a rubber band.
Mix 1 cup of water, 2 tablespoons of dish soap, and 1 tablespoon of glycerin in a bowl for longer-lasting bubbles.
Dip the cloth-covered end into this solution, then blow gently through the bottle’s mouth to create a continuous stream of bubble variations.
Want to spice it up? Add food coloring for some snake enhancements and vibrant colors!
This project uses common items, takes under 10 minutes, and is a great boredom-buster for everyone. Ready to get started?
Handmade Rope Basket
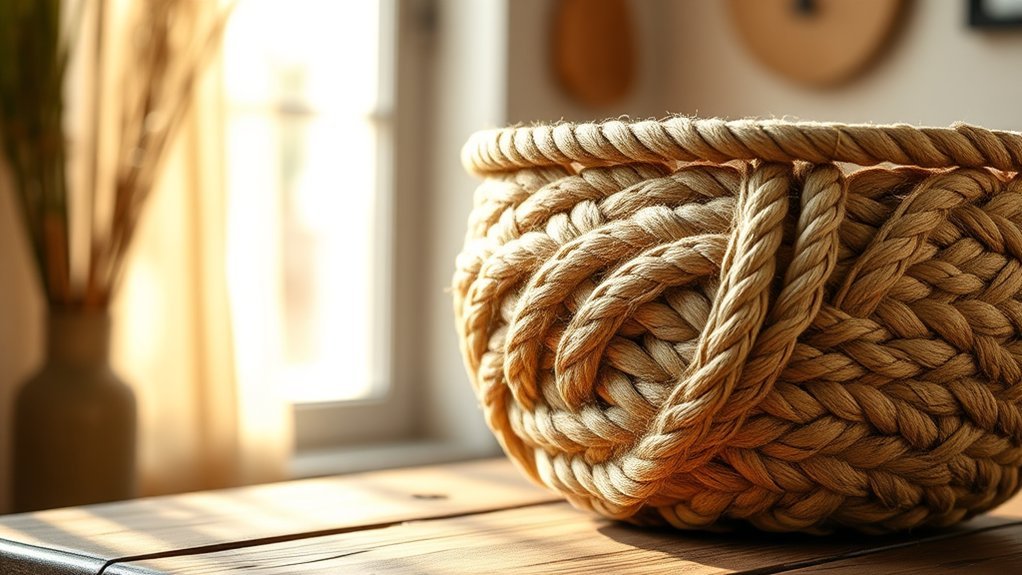
Creating a handmade rope basket is a fun and practical project that anyone can try.
Craft your own handmade rope basketit’s a delightful and useful project perfect for anyone!
Youll enjoy the simple process of rope coiling to form a sturdy base.
Heres what you need to do:
- Use sturdy cotton or jute rope, about 1/4 to 1/2 inch thick.
- Apply hot glue along the edges of each coil for stability.
- Wrap fabric scraps or yarn around every 4-6 inches for flair.
Aim for a basket height of 6-10 inches and a base diameter of 8-12 inches.
This way, youll have a great spot for storing office supplies or crafts.
After youve built it, let the glue dry for 1-2 hours.
Your basket will be ready for use and look fantastic!
Homemade Pop It Fidget Toy
Ever wondered how to make your own Pop It fidget toy? Its easier than you think! Start with a silicone mold or some bubble wrap.
Gather your materials: clear silicone sealant, a mixing cup, a stir stick, and some food coloring.
Mix the silicone as directed, pour it into your mold, and let it cure for 24-48 hours. This creates the popping effect you love!
For fun Pop It variations, try adding glitter or small beads for a unique twist.
Not only is this a cool fidget innovation, but its also a great stress reliever.
Plus, you can make your homemade version for under $5. Its a fun project for everyone, and who doesn’t love a little DIY creativity?
Candy Cane Reindeer
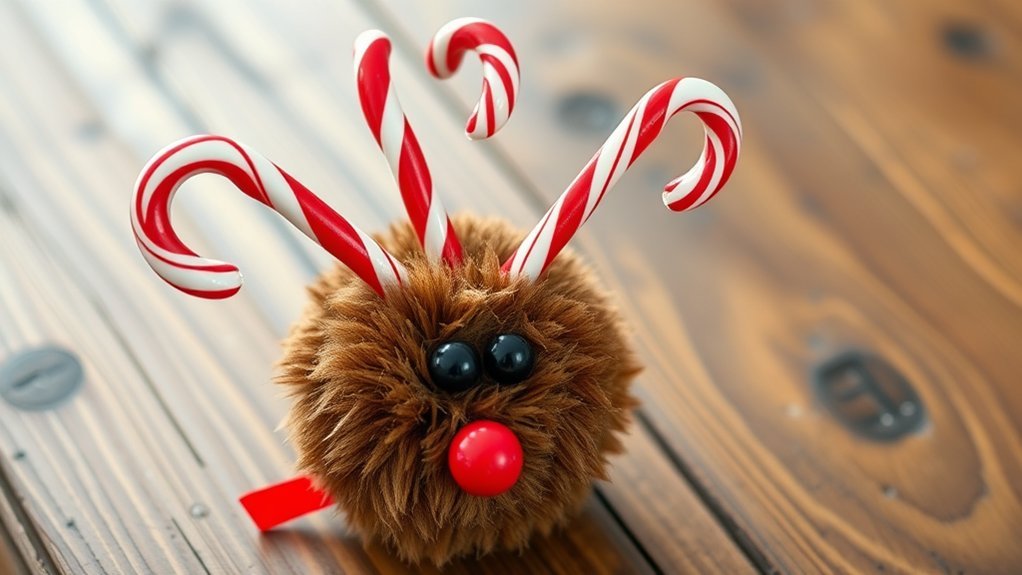
After making your own Pop It fidget toy, why not add a festive touch to your home with some candy cane reindeer? These charming decorations are quick and easy to craft, making them perfect for holiday customs.
Here’s what youll need:
- Candy canes
- Brown pipe cleaners
- Adhesive googly eyes
Start by bending two pipe cleaners into antlers and gluing them on top of a candy cane. Add googly eyes and a small red pom-pom for the nose. You can even wrap a ribbon around the neck or sprinkle some glitter for extra sparkle! These seasonal symbols can be used as gifts or party favors, bringing a delightful touch to your holiday decor.
Ceramic Spoons

Ceramic spoons can add a personal touch to your kitchen that store-bought utensils just cant match.
You can create custom ceramic spoons using air-dry clay, which makes spoon customization super easy at home.
Shape the clay into spoon forms and then bake them in a standard oven at 275°F for about 15-20 minutes.
Once theyre hard, decorate your spoons with non-toxic acrylic paints or glazes.
Remember to let each layer dry for 1-2 hours.
Seal your designs with clear acrylic sealer for durability.
After 24 hours, your spoons are ready to use!
With Clay Innovations, you can personalize them with fun patterns, making your kitchen both functional and stylish.
Painted Rock Garden Markers
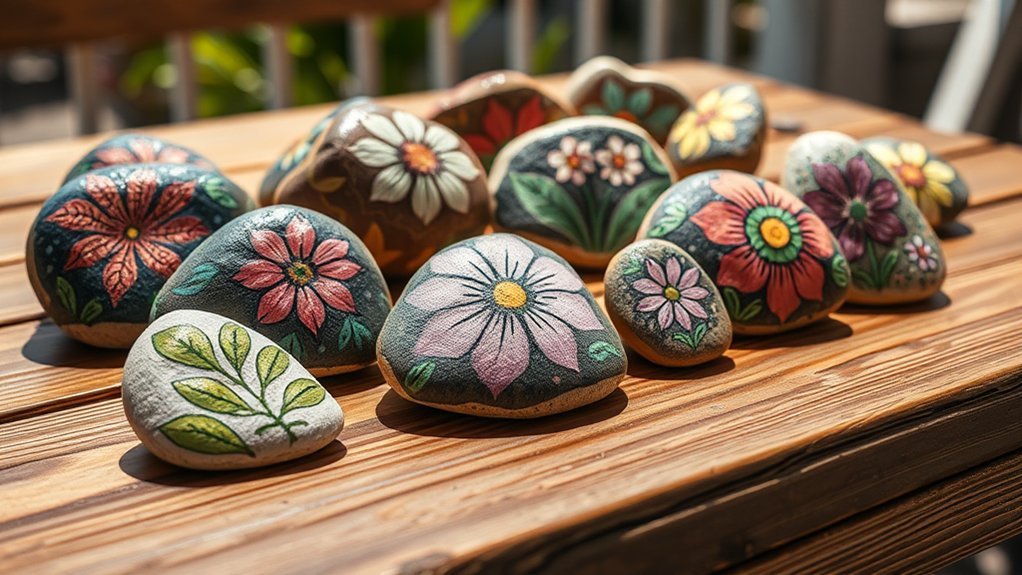
If you loved creating those unique ceramic spoons, you might want to try your hand at painted rock garden markers.
This fun project involves picking smooth, flat rocks and giving them a personal touch.
Engage your creativity by choosing smooth, flat rocks and transforming them into personalized garden markers.
Heres what youll need:
- Outdoor acrylic paints or permanent markers
- Clear outdoor sealant, like polyurethane spray
- Brushes for painting and a soft cloth for prep
Start by washing and drying your rocks to guarantee good paint adhesion.
Then, release your creativity with rock painting!
You can draw plant names or cute illustrations.
Dont forget to apply at least two coats of sealant; it protects your artwork from sun and rain.
This simple DIY enhances your garden while making plant care way more engaging.
Additionally, these markers can add a whimsical charm to your outdoor space with creative garden decor.
Incorporating rustic elements can elevate the natural appeal of your garden markers with rustic home decor.
Consider using natural tones and textures to complement the rustic theme of your garden with rustic landscaping ideas.
DIY Flower Crowns
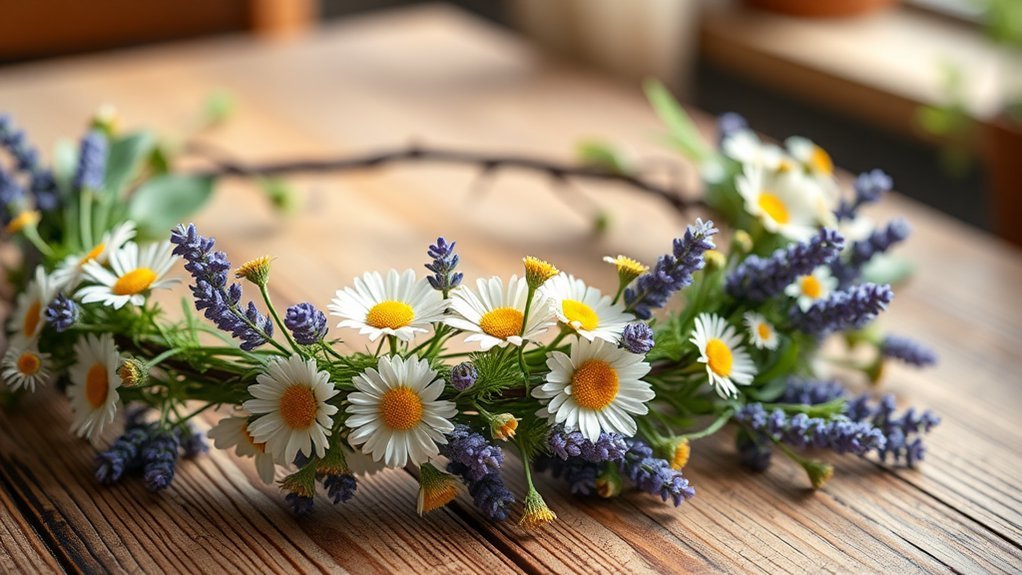
Have you ever wanted to wear a piece of nature in your hair? Making a DIY flower crown is a fun way to do just that!
Start by measuring your head with a flexible tape measure, then cut a piece of 18-gauge wire for the crown assembly.
Now, lets talk flower choicesgather fresh or artificial flowers like daisies, roses, and baby’s breath.
Secure each flower stem to the wire using floral tape, wrapping it tightly to keep everything in place.
You can even add greenery like fern leaves for a bit more flair.
Once youre done, try it on to make sure it fits well.
With proper attachment, your crown can last for hours of fun!
Upcycled T-Shirt Tote Bags

Wondering what to do with that old T-shirt you never wear?
You can transform it into a reusable tote bag in just 15-30 minutes!
Transform your old T-shirt into a stylish reusable tote bag in just 15-30 minutes!
This fun Tshirt upcycling project is easy and only requires a few common items.
Heres how you can make it:
- Cut off the sleeves and bottom hem.
- Tie or sew the cut edges for handles and a base.
- Personalize your bag with fabric markers, patches, or stencils.
Your upcycled tote can hold 10-15 pounds of groceries or books, making it practical for everyday use.
Plus, its machine-washable for easy cleaning.
So, grab that T-shirt and get started on some eco-friendly bag personalization!
You’ll be reducing waste while creating something unique.
Fabric Scrap Bookmarks
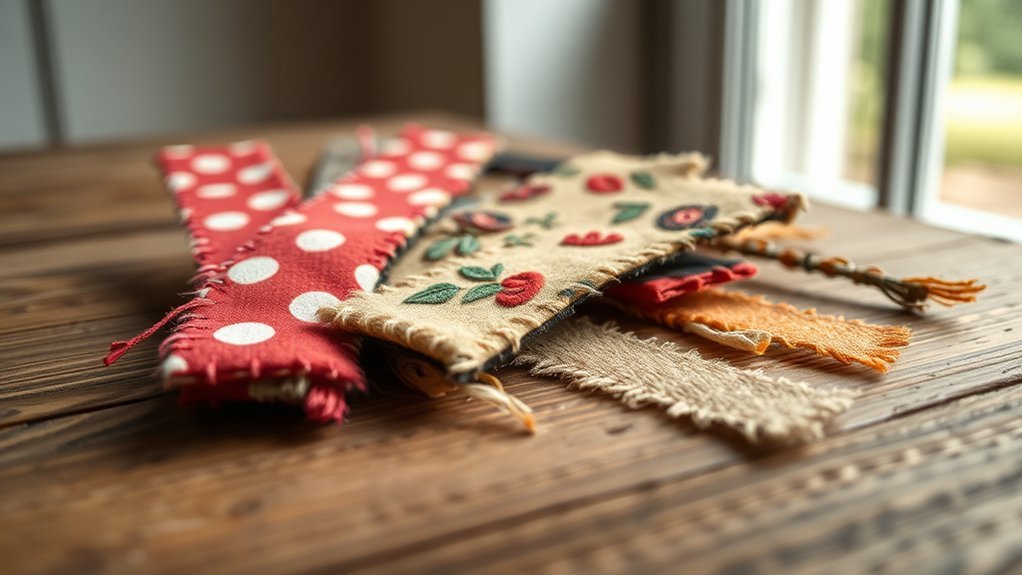
Crafting fabric scrap bookmarks is a fun way to use leftover fabric and keep your place in your favorite book.
Start by cutting your fabric scraps into 2-inch by 6-inch rectangular strips for a perfect bookmark shape.
You can use a sewing machine or some fabric glue to hem the edges, which helps prevent fraying.
Want to get creative? Add decorative elements like buttons or ribbons for unique bookmark variations.
Not only are these bookmarks practical, but theyre also eco-friendly, as they reduce waste from other projects.
You can whip up a set in under 30 minutes, making this a quick DIY project thats perfect for beating boredom.
Personalized Notebooks
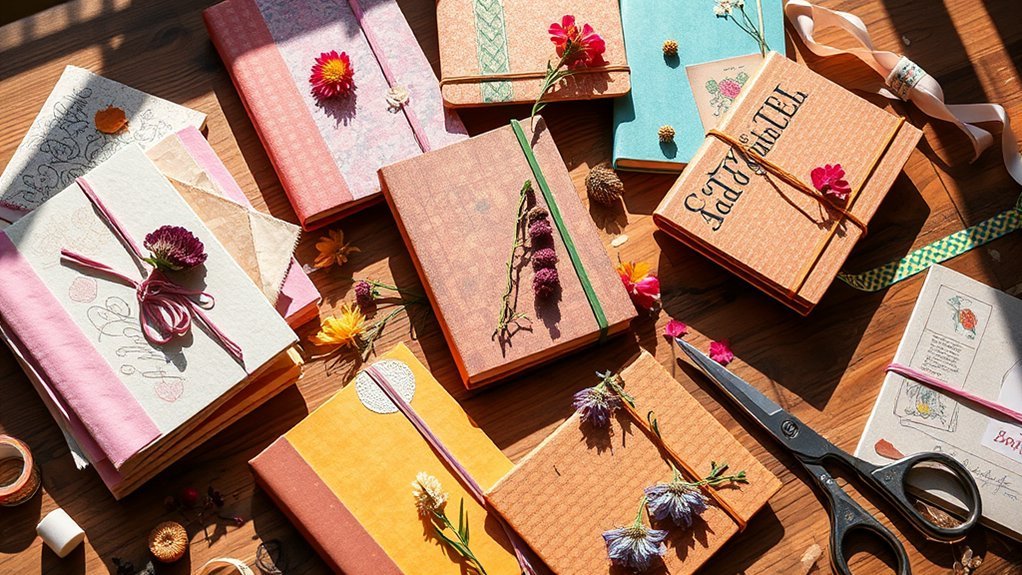
After you’ve made some colorful fabric scrap bookmarks, why not personalize your own notebooks?
It’s a fun way to express your style.
Personalizing your notebooks is a delightful way to showcase your unique flair and creativity.
Start by choosing different notebook themes.
You can use oil-based paint pens or acrylic paints to create unique designs.
Try these ideas:
- Decorate with cut-out images or fabric scraps using decoupage glue for durability.
- Cover the notebook with sturdy fabric, adding closures like zippers or buttons.
- Incorporate elements like criss-cross ribbon for extra flair and functionality.
Dont forget to write journal prompts inside!
Theyll inspire your creativity and keep you organized.
Personalizing your notebooks not only makes them pretty but also gives you a special place to jot down your thoughts.
Friendship Bracelets
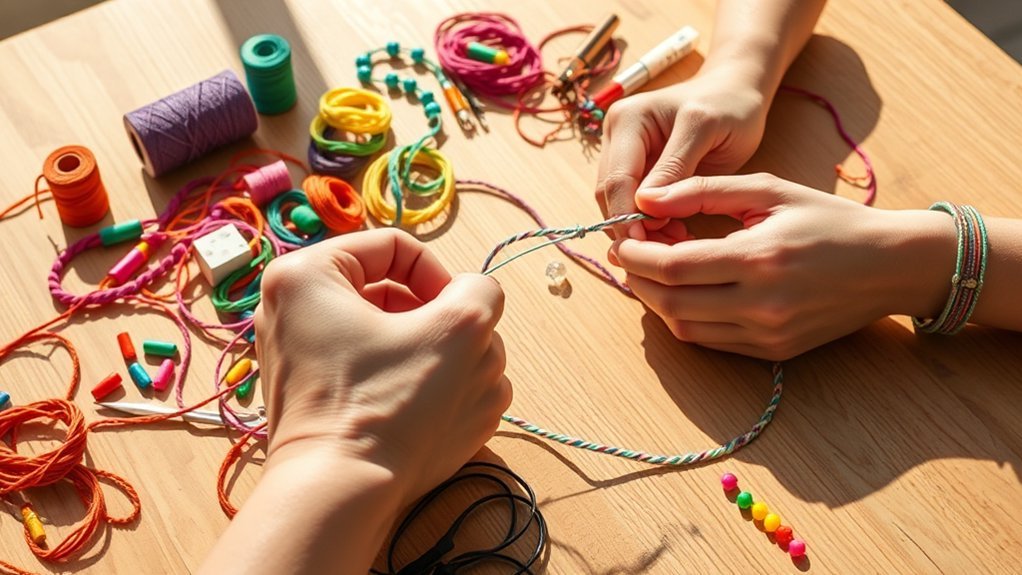
Friendship bracelets are a fun and creative way to show your pals you care.
Making them involves using colorful embroidery floss, measuring about 60-72 inches long.
You can use friendship knots, like forward and backward knots, to create cool braided patterns, such as chevrons or stripes.
Its a simple process that just needs some scissors and tape.
You can even spice them up with beads or charms to make each bracelet unique.
Plus, it takes only 30-60 minutes to finish one, so it’s perfect for a quick boredom buster.
Just think of it as a little craft session where you can express your style and strengthen those friendships.
Ready to get knotting?
DIY Photo Frame
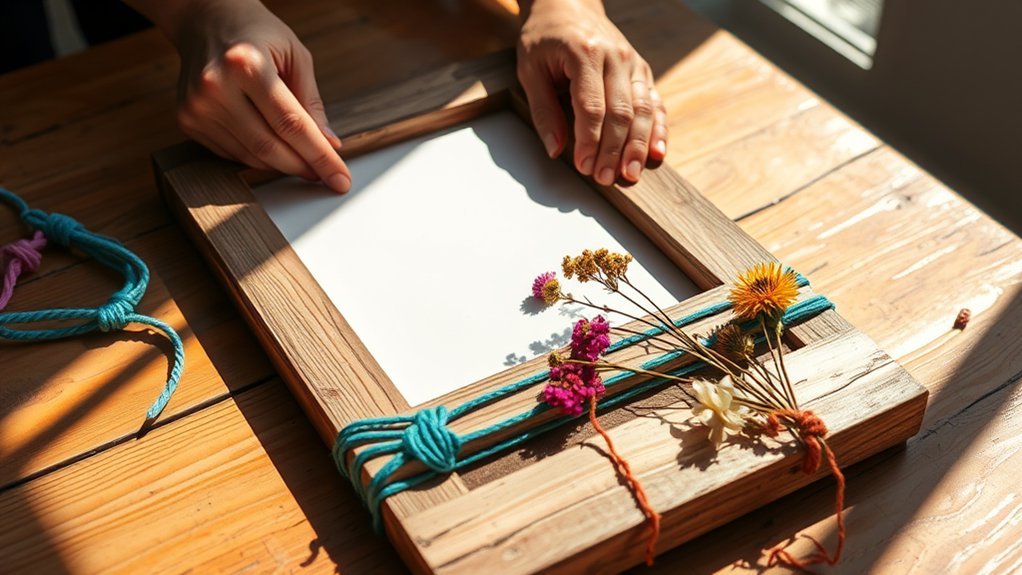
Transforming your favorite memories into personalized decor is easier than you think with a DIY photo frame.
Start by using recycled materials like cardboard or wooden scraps to create your frame variations.
You can cut pieces into shapes like rectangles or ovals for a unique touch.
To enhance your frame’s look, consider these ideas:
- Use acrylic paints for a splash of color.
- Decorate with washi tape for a fun pattern.
- Add beads or pressed flowers for a special touch.
Make sure to measure your photo size and add a 0.5-inch border.
Secure your photo with hot glue or double-sided tape.
With just a little effort, you’ll have a stylish frame that showcases your memories perfectly!
Watercolor Resist Art
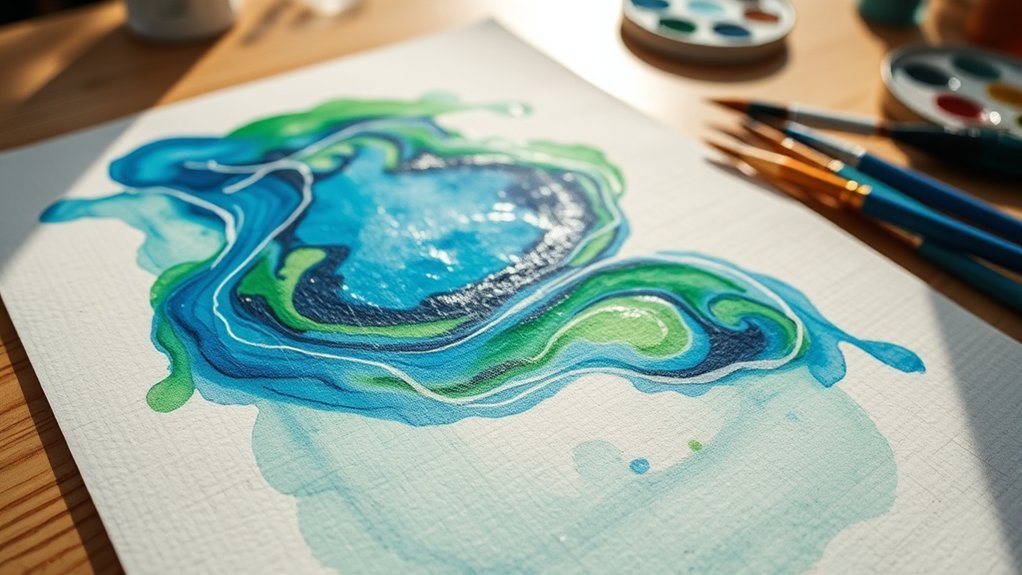
Get ready to release your creativity with watercolor resist art! This fun technique uses resist materials like wax or oil pastels to create cool patterns. Youll enjoy how the resist repels paint, making defined designs. Heres a quick look at common materials and steps to get you started:
| Material | Purpose | Drying Time |
|---|---|---|
| Watercolor Paper | Base for your artwork | N/A |
| Wax or Oil Pastels | Create resist patterns | 5-10 minutes |
| Water-Based Paints | Fill in the designs | N/A |
Just remember to let the resist dry completely before you begin watercolor blending. Its easy, quick, and perfect for all skill levels. So, what are you waiting for? Jump in!
Beaded Keychains
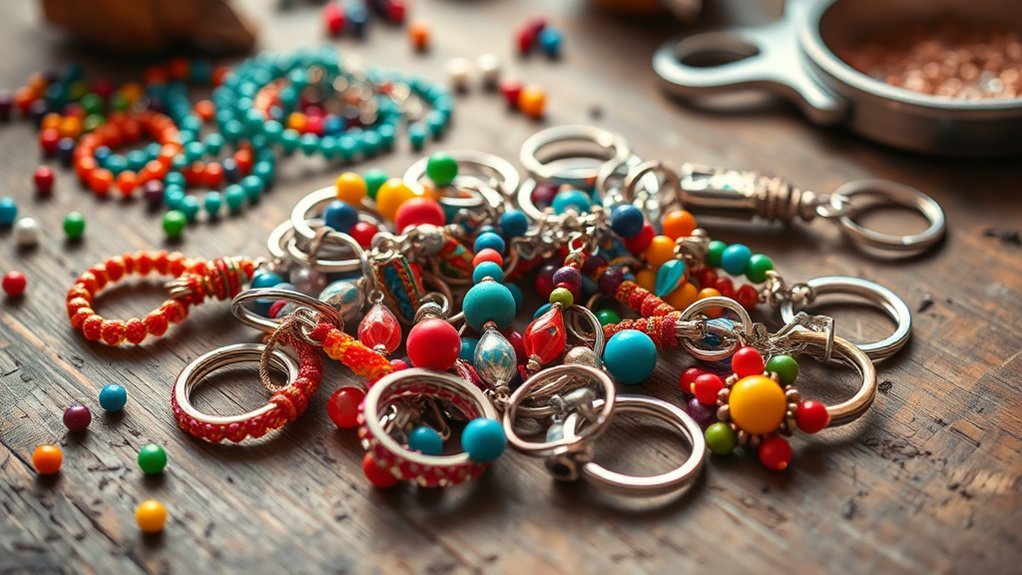
Making beaded keychains is a fun and easy project that anyone can try.
Youll need a variety of colorful beads and some jewelry wire or string.
Heres what you can do to get started:
- Choose 20-50 beads in different sizes and shapes, like glass or wooden.
- Experiment with bead patterns, like alternating colors or repeating a hue every third bead.
- Secure the ends with crimp beads or knots, and attach a keychain ring with a jump ring.
This whole process takes about 15-30 minutes, depending on the designs complexity.
Plus, you can customize your keychain with metallic or glow-in-the-dark beads for extra flair.
Its a creative way to beat boredom while making something useful!
Embellished Clipboards

Embellishing clipboards can turn a plain organizational tool into something truly unique.
Start with surface preparation by cleaning your clipboard with sandpaper or a primer.
This helps your decorations stick better, so they last longer.
Next, think about your pattern selection.
You can use washi tape, stickers, or even fabric to create a design that matches your style.
For a professional touch, use Mod Podge to attach these elements, applying 2-3 layers for durability.
Want to add a personal flair?
Customize with acrylic paints or markers for unique designs or quotes.
This beginner-friendly project takes just 20-45 minutes, making it a quick way to spruce up your space.
What’ll you create?
DIY Wind Chimes
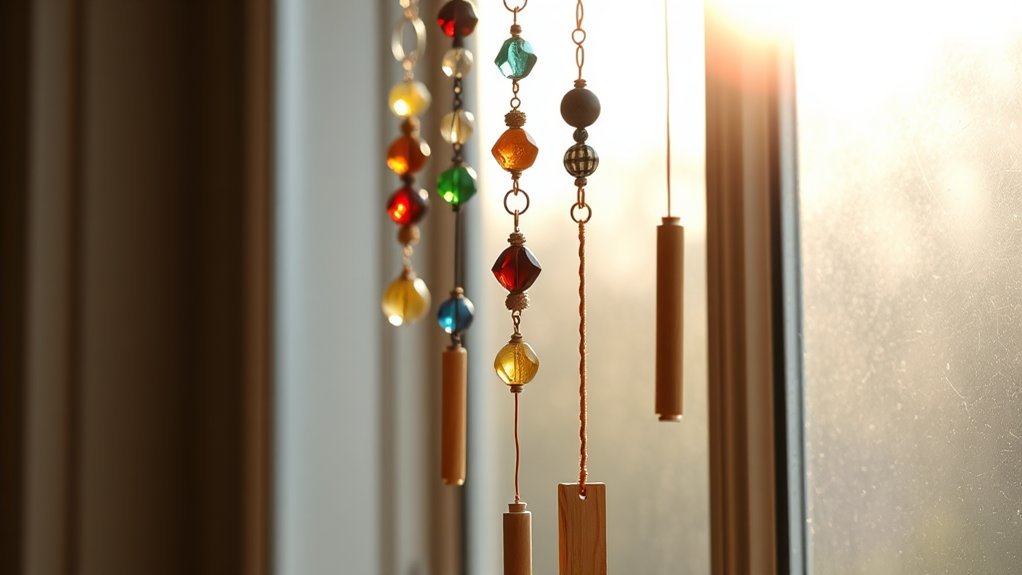
Creating DIY wind chimes can be a fun way to add a touch of charm to your outdoor space.
You can gather materials like old keys, beads, and string to make something unique.
By experimenting with tune lengths, you can create up to 10 different tones!
Heres how to get started:
- Use recycled glass bottles or metal tubes for base mounting.
- Attach colorful beads or shells for extra flair.
- Vary string lengths from 6 to 12 inches for harmonic resonances.
Drilling holes and securing components is essential for durability.
With a little effort, you’ll have a personalized decoration that gently sways in the breeze.
Consider incorporating a small garden water feature to complement the soothing sounds of your wind chimes.
Painted Plant Pots
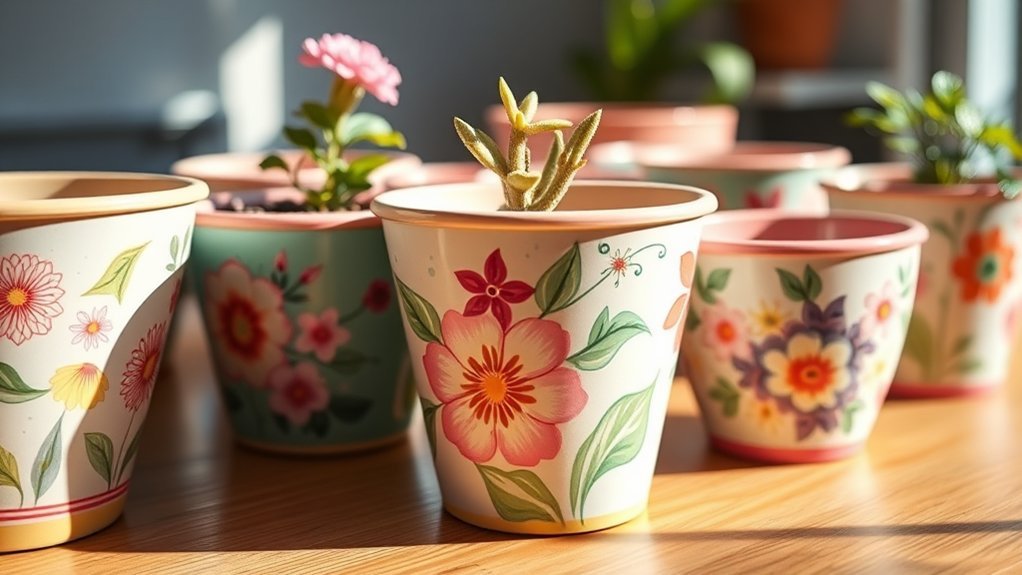
After you’ve enjoyed making those charming wind chimes, why not turn your attention to painted plant pots?
This project’s simple and fun, using terracotta or ceramic pots as your base.
Their porous surface helps the acrylic paint stick well.
Pick some vibrant colors, and remember, the paint dries quickly in 15-30 minutes!
You can try various pot designs by using stencils or painting freehand patterns, like geometric shapes or flowers.
Once you’re done, seal your pots with a clear varnish to protect them.
This eco-friendly project repurposes old pots and can be completed in under an hour.
So, gather your brushes and paints, and let your creativity flow!
Ready to give your plants a new home?
Glitter Mason Jars
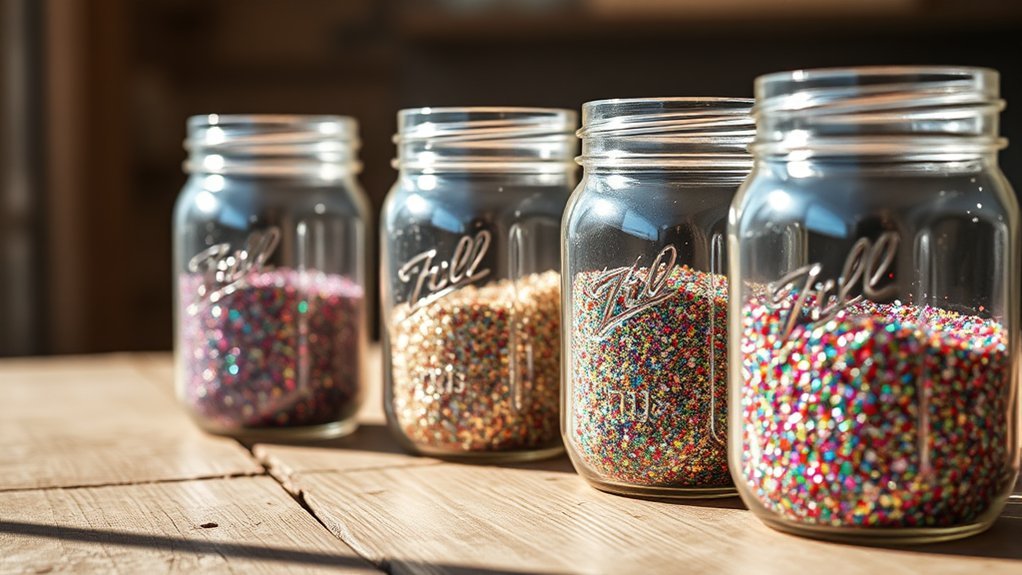
Have you ever thought about how a simple Mason jar can brighten up your space?
Glitter Mason jars are an easy and fun DIY project.
You just need to mix equal parts glue and water, then apply it to the jar’s surface.
Sprinkle on fine glitter to create beautiful glitter patterns.
Heres what youll need:
- A standard 16-ounce Mason jar
- Mod Podge adhesive for a secure finish
- Glitter in your favorite colors
Dont forget about drying timeslet each layer dry for at least 1-2 hours before adding a sealant coat.
These jars make great candle holders or storage containers, adding elegance to your home for under $5.
Enjoy crafting your unique decor!
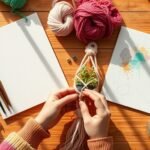
DIY Dream Catchers
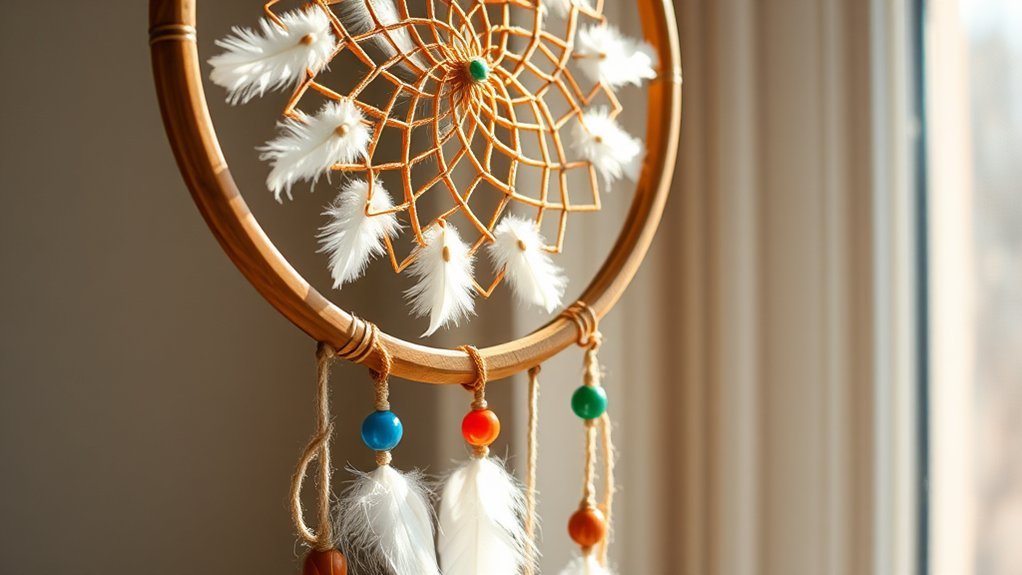
Dream catchers can add a unique touch to your room while also giving you a fun project to tackle. To create yours, start with a hoop, weave the yarn into a web, and add feather attachments for flair. Its a blend of art and tradition! Heres a quick guide:
| Step | Materials Needed | Tips |
|---|---|---|
| Wrap the hoop | 6-10 inch hoop, fabric/yarn | Use colorful yarn for a pop! |
| Weave the web | String, beads | Space beads 1-2 inches apart. |
| Hang it up | Feathers, ribbons | Hang above your bed for calm vibes. |
Making a dream catcher is all about creativity and personalization, so dont hesitate to recycle materials. So, are you ready to start your dream weaving adventure?
Scrapbook Page Layouts
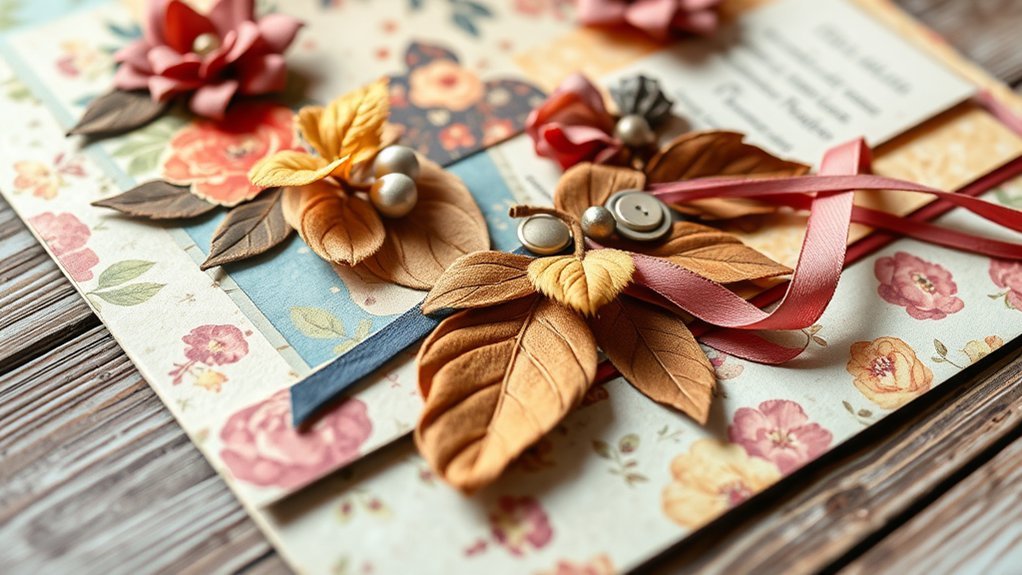
Scrapbooking is a fun way to preserve your memories and get creative at the same time.
Scrapbooking offers a delightful blend of creativity and memory preservation, making it a joyful hobby for everyone.
Youll love exploring different scrapbook page layouts that enhance your photos.
Start with a standard 12×12 inch acid-free paper base to keep your photos safe.
Remember, good photo composition includes a focal point, like a standout picture, balanced with supporting elements.
Here are some ideas to try:
- Layer patterned paper and stickers for depth.
- Use border techniques to frame your photos or memorabilia.
- Follow the rule of thirds for a balanced look.
With digital tools available, you can easily customize your layouts.
DIY Candle Holders
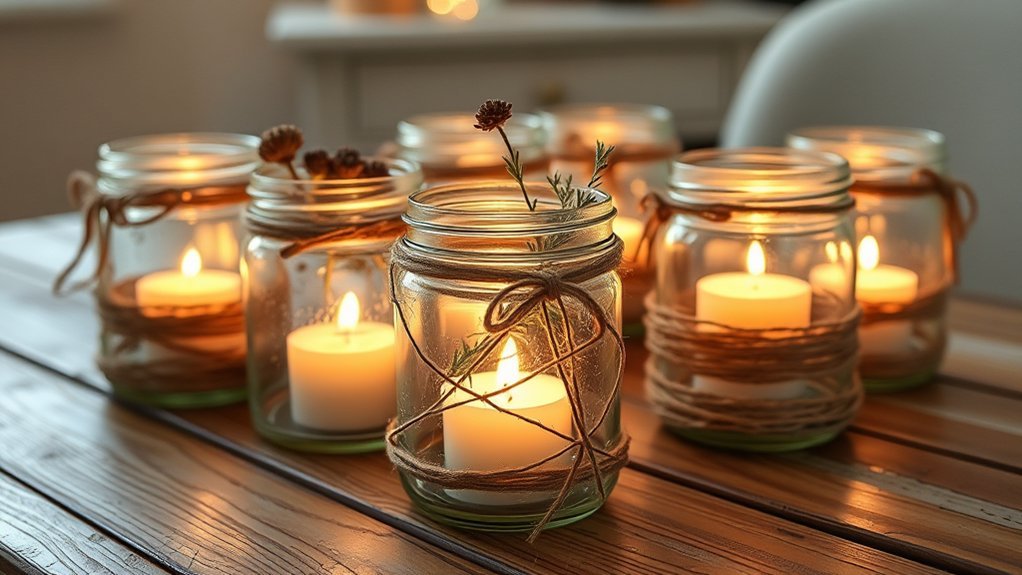
Creating a cozy vibe at home doesnt have to be complicated. You can easily make DIY candle holders that look great and save money. Here are some fun Holder Innovations you can try:
| Material | Technique |
|---|---|
| Glass Jars | Wrap with jute twine, add beads or shells. |
| Wine Bottles | Cut, sand edges, and paint with metallic colors. |
| Wooden Blocks/Slices | Drill holes for tea lights, seal with varnish. |
| Mason Jars | Use LED candles for a safe, flameless option. |
| Tin Cans | Layer tissue paper with Mod Podge for a glow. |
Remember to follow safety techniques, especially when cutting glass. Enjoy crafting your stylish candle holders and brighten up your space!
Paper Mache Sculptures
Paper mache sculptures can be a fun and creative way to add unique decor to your home.
Youll need some basic materials, like newspaper and a paste made of flour and water or glue.
The process involves layering strips of paper over a base, like a balloon.
Here are some common designs you might try:
- Animal figures, like a colorful bird or a funky cat
- Masks that reflect your favorite characters or emotions
- Abstract shapes that add a modern touch to your space
Just remember to let each layer dry for at least 24 hours before adding more.
Youll typically use 3-5 paper layers for a sturdy finish.
Custom Tote Bags
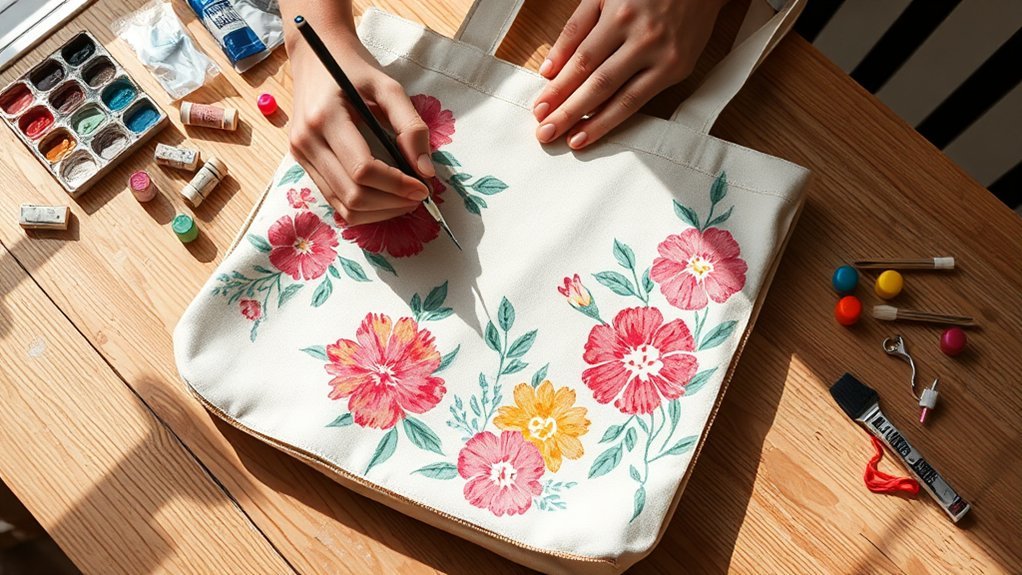
Custom tote bags are a great way to express your personal style while being eco-friendly.
Express your unique style and embrace sustainability with custom tote bags that reflect your personality.
You can start with a plain canvas base and delve into bag customization.
Use fabric paints or markers to add your own illustrations or quotes, sealing them for durability.
Want something more vibrant? Try iron-on transfers or heat transfer vinyl for cool images that last.
If youre into precise patterns, stencils and acrylic paint work wonders for creating unique tote designs.
Choose reusable materials like organic cotton to make your bag even more environmentally friendly.
Dont forget to add practical features, like reinforced handles or interior pockets, to boost functionality.
DIY Coasters
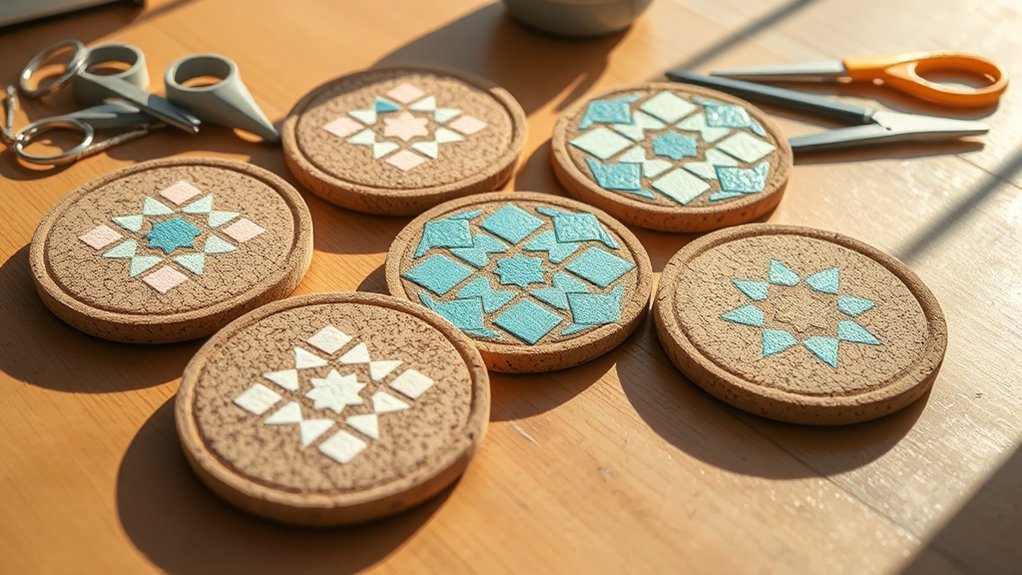
Coasters are a handy way to protect your furniture from drink rings while adding a personal touch to your home.
You can create unique DIY coasters using a few simple materials.
Try these ideas:
- Cut 4-inch squares from cork sheets and decorate them with acrylic paint or markers.
- Use old tiles or cardboard sealed with Mod Podge for colorful, waterproof designs.
- Embed dried flowers or glitter in resin poured over wooden discs for glossy, durable coasters.
Whatever you choose, personalizing your coasters can be a fun way to express your style.
Plus, theyll keep your surfaces safe and sound.
So, what’ll you create today?
Grab your supplies and get crafting!
Fabric Scrap Wall Art
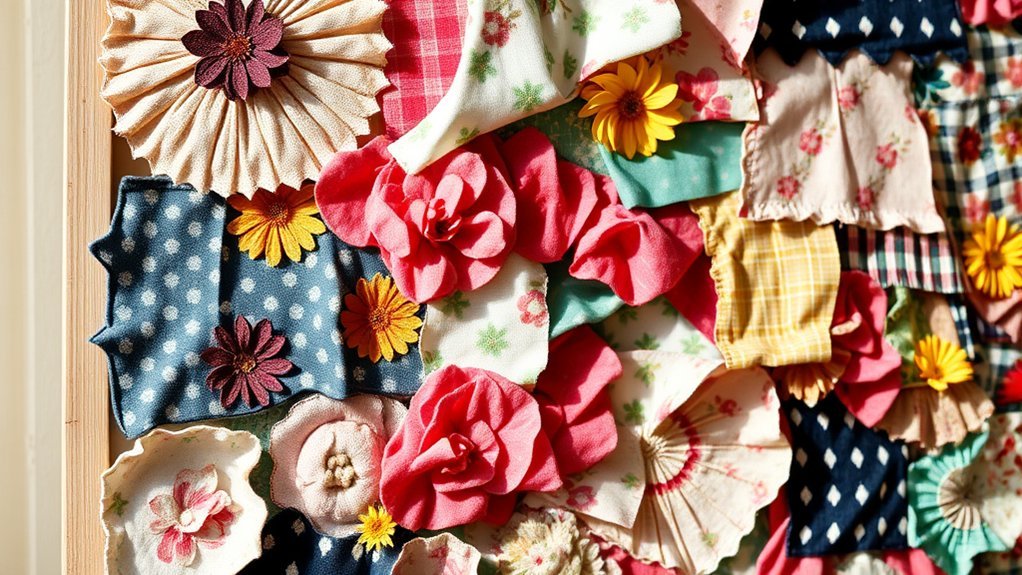
Are you looking for a fun way to spruce up your walls? Fabric scrap wall art is a great option!
You can transform old fabric scraps into eye-catching designs by cutting them into shapes.
Transform old fabric scraps into stunning designs by cutting them into creative shapes.
Arrange these pieces on a canvas or board for a personalized touch.
Use fabric glue or a hot glue gun to attach them securely, creating layers that add texture techniques and depth.
You can experiment with different fabric types, like cotton or patterned scraps, to play with pattern blends.
This eco-friendly project uses materials from old clothes, making it easy and accessible.
In less than an hour, youll have a unique piece of art. Just grab some scissors, and you’re set!
Upcycled Bottle Planters
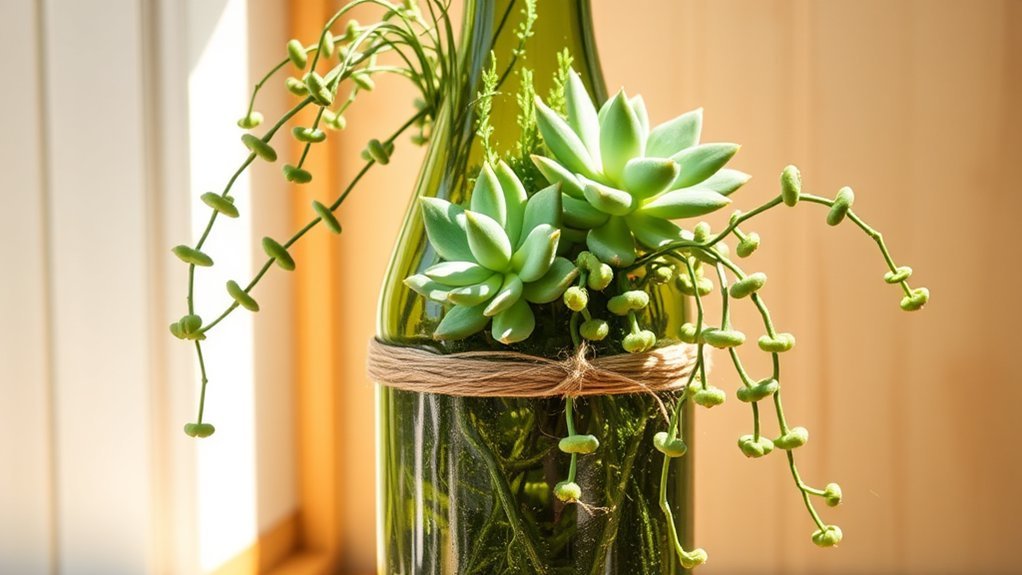
Turn your old plastic or glass bottles into charming planters!
This fun DIY project not only helps reduce waste but also gives you a great way to decorate your space.
Heres how to get started:
- Cut the top off the bottle for your planter.
- Use drainage techniques like adding pebbles or activated charcoal at the bottom.
- Get creative with non-toxic paint or twine to enhance the look.
Frequently Asked Questions
What to Do When You Are Bored at Home Aesthetic?
When youre bored at home, try spa relaxation with a soothing bath or meditation. You could also host a tea tasting, exploring different flavors and aromas while enjoying a cozy atmosphere, making your day delightful.
What Can I Make at Home When I’m Bored?
When boredom creeps in like a shadow, release your creativity! You can delve into repair hacks or brainstorm invention ideas, transforming everyday items into treasures, igniting sparks of joy and inspiration right in your home.
How to Make Cute Aesthetic Things?
To make cute aesthetic things, try bead weaving for colorful jewelry or create stunning resin art with molds and vibrant pigments. Both techniques let you express creativity and craft unique pieces thatll brighten up your space.
What to Make When Bored Crafts Easy?
When you’re bored, try crafting with recycled materials. Create colorful kitchen crafts, like decorative jars or fun utensil holders. These easy projects can spark creativity while keeping your hands busy and your space vibrant.
Conclusion
So, there you have it??8 fun DIY projects to keep you busy at home. Did you know that around 80% of people feel more relaxed after finishing a creative task? Thats pretty cool, right? Whether youre melting crayons or making coasters, these projects can spark your creativity and give you something to show off. So, why not grab some supplies and give one a try? You might just discover a new hobby or skill along the way!